
Why this screen
On “Budget”, a category has one row and one number. Here is everything behind it.
Will it last until the end of the month
“Available” and under it “≈ … a day”: how much you can spend each day until the end of the month without going negative.
Where the money went
All of this category's transactions for the month, by day. Tap any one to open its card.
How much you really need
“Spending trends” shows how much usually goes out per month. If you set aside less, every month ends in a minus.
How to open it
“Budget” — tap a category row. The screen opens on the month selected on “Budget”. That's with the phone upright: in landscape, tapping a table row opens the amount calculator, and on a tablet it opens a panel on the right (below).
“Overview” — tap a row in the “Overspent” or “Running out” block.
“Reports” — tap a list row in “Where the money went” or a tile in “Deviation”. The screen opens on the report's month.
What's where on the screen
The screen scrolls: the summary at the top, then the “Goal”, “Note” and “Spending trends” cards, and below them the month's transactions. Tap a screenshot to open it full screen.
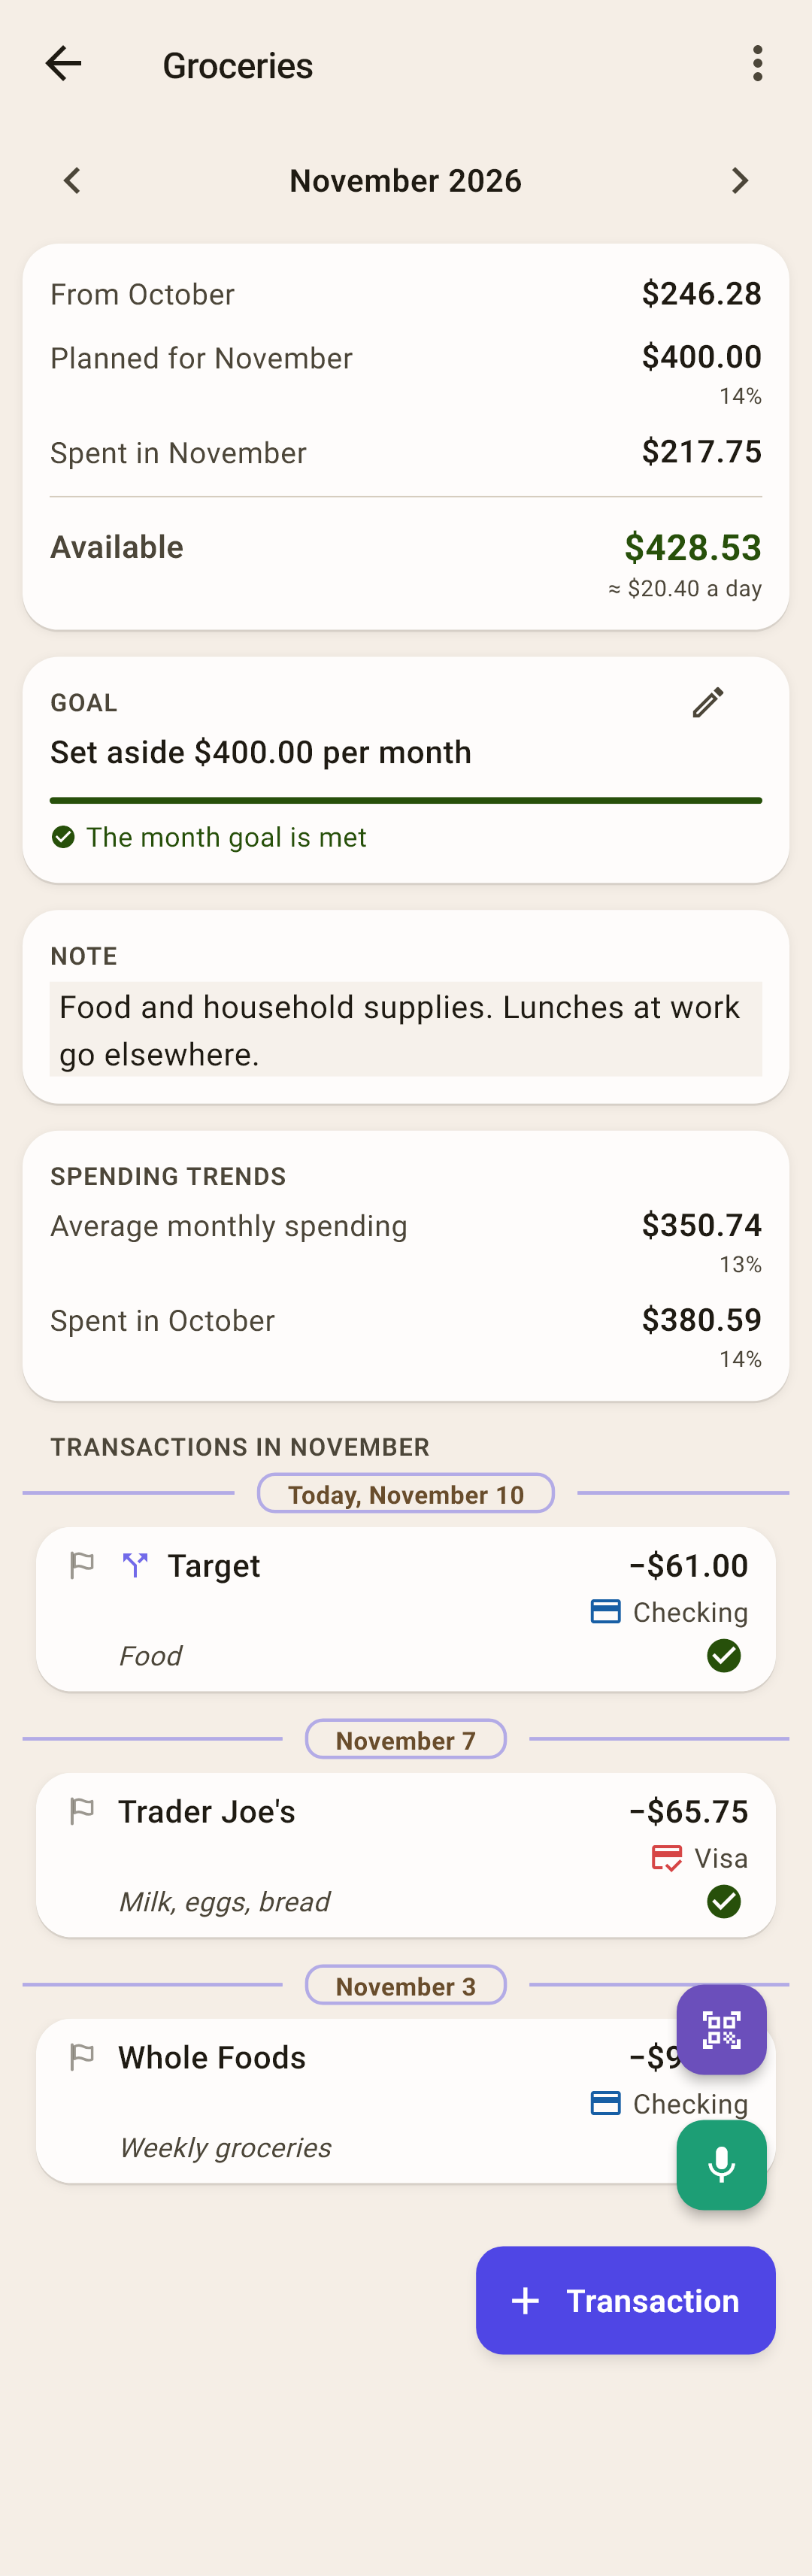
Name — the category's name. Rename it in the “⋮” menu.
“⋮” — hide, rename or move to another group, delete. Details — below.
Month — “‹ ›” flip through months: past and future, with no limit. Details — below.
“From …” — how much was left in the envelope from last month.
“Planned for …” — how much you set aside in this envelope this month. In small print under the amount — what percent of the month's income that is.
“Spent in …” — how much left the envelope this month, after refunds.
“Available” — how much is in the envelope now. The same number as in the category row on “Budget”.
“≈ … a day” — how much you can spend per day until the end of the month. Only in the current month and only if “Available” is above zero.
“Goal” — the category's goal for this month: how much more to set aside. More in the article “Goals”.
“Note” — your own text about this category. Details — below.
“Spending trends” — how much goes out on average per month. Details — below.
Date — the month's transactions by day, newest at the top. Details — below.
Transaction — a row like in “Activity”, just without the category: there's only one here.
“+ Transaction” — a new transaction with the category already chosen in the form.
The summary: where the numbers come from
The summary's four rows add up to one formula:
“From …” + “Planned” − “Spent” = “Available”
A plus carries over to the next month, a minus doesn't
Didn't spend it all? The rest stays in the envelope and shows up next month in the “From …” row. Spent more than there was? This month “Available” is red. When the month turns over, the minus is reset: next month “From …” will be 0.
How it works
Where the reset minus goes depends on how you paid. With cash or a debit card, it reduces next month's “unassigned”. With a credit card, it became card debt. More in the article “Budget”.
Percent of income
Under “Planned” — what percent of the month's income you set aside in this envelope. The same percent as in the “Percent of income” badge on “Budget”. No income in the month — no percent. It's counted from the “… budget” line of the “Month budget” card — without last month's leftover; why the percent can then look too high — in the article “Budget”.
“≈ … a day”
“Available” is divided by the days left until the end of the month, today included, and rounded down — so a day never gets more than there is. Spent less today? Tomorrow the number grows.
Note
Write what belongs in this category, what you're saving for, what you agreed on — anything that will help six months from now. Tap the “Add a note for the category…” field and type: the note saves by itself, there's no button. With a cloud, it reaches your other devices.
“Spending trends”
How much usually goes out of this category. It counts the 12 full months before this one; the current month isn't included because it isn't over yet. Spending is after refunds.
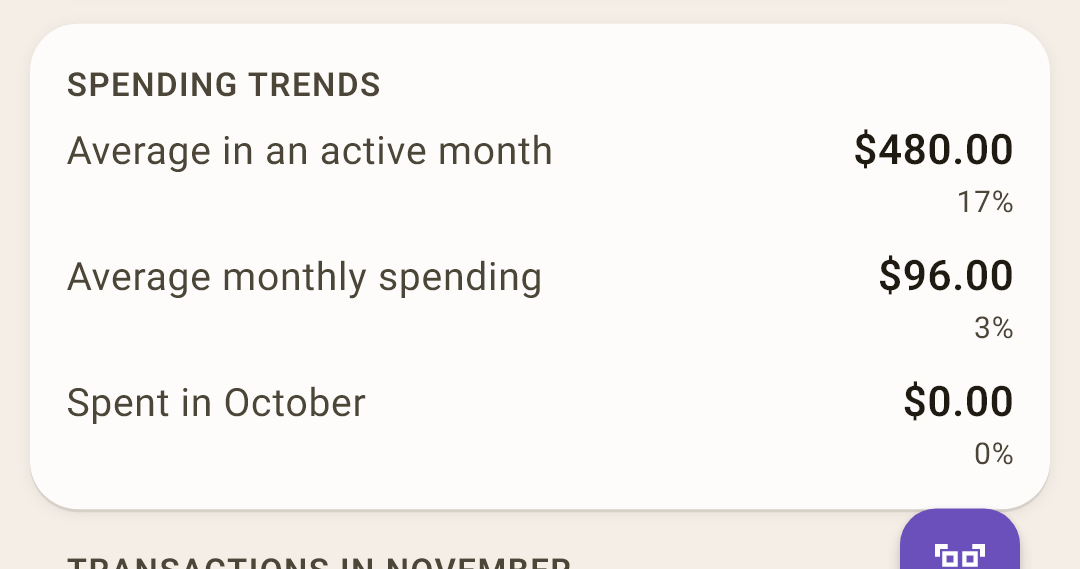
“Average monthly spending” — how much goes out on average per month, counting months with no spending too. That's how much is worth setting aside every month so the envelope doesn't go negative.
“Average in an active month” — the average only over months with spending. It appears when there wasn't spending every month: in the screenshot, “Big purchases” has $480 in a month with a purchase, and $96 on average across every month.
“Spent in …” — how much went out last month: compare it with this one.
Percentages under the amounts — what percent of income that is: for the averages, of the average income over the same months; for last month, of its income.
The month's transactions
All of this category's transactions for the screen's month, by day: newest at the top. For a split amount, only its part with this category is shown — in the screenshot, “Target”.
| Do this | What happens |
|---|---|
| Tap a row | The transaction card — the same as in “Activity”. More in the article “Activity”. |
| Tap the circle on the right | The “Cleared” mark, as in “Activity”. |
| Swipe left | “Edit” — the transaction form. |
| Swipe right | “Delete” — after a confirmation. “Undo” appears at the bottom. |
The order of transactions within a day and the day total next to the date are set in “Activity”: “⋮” → “Sorting” and “Daily total”. They're the same here.
Another month
“‹” and “›” above the summary flip through months. Leave the current month, and “Today” appears at the bottom left: tap it to return to the current month.
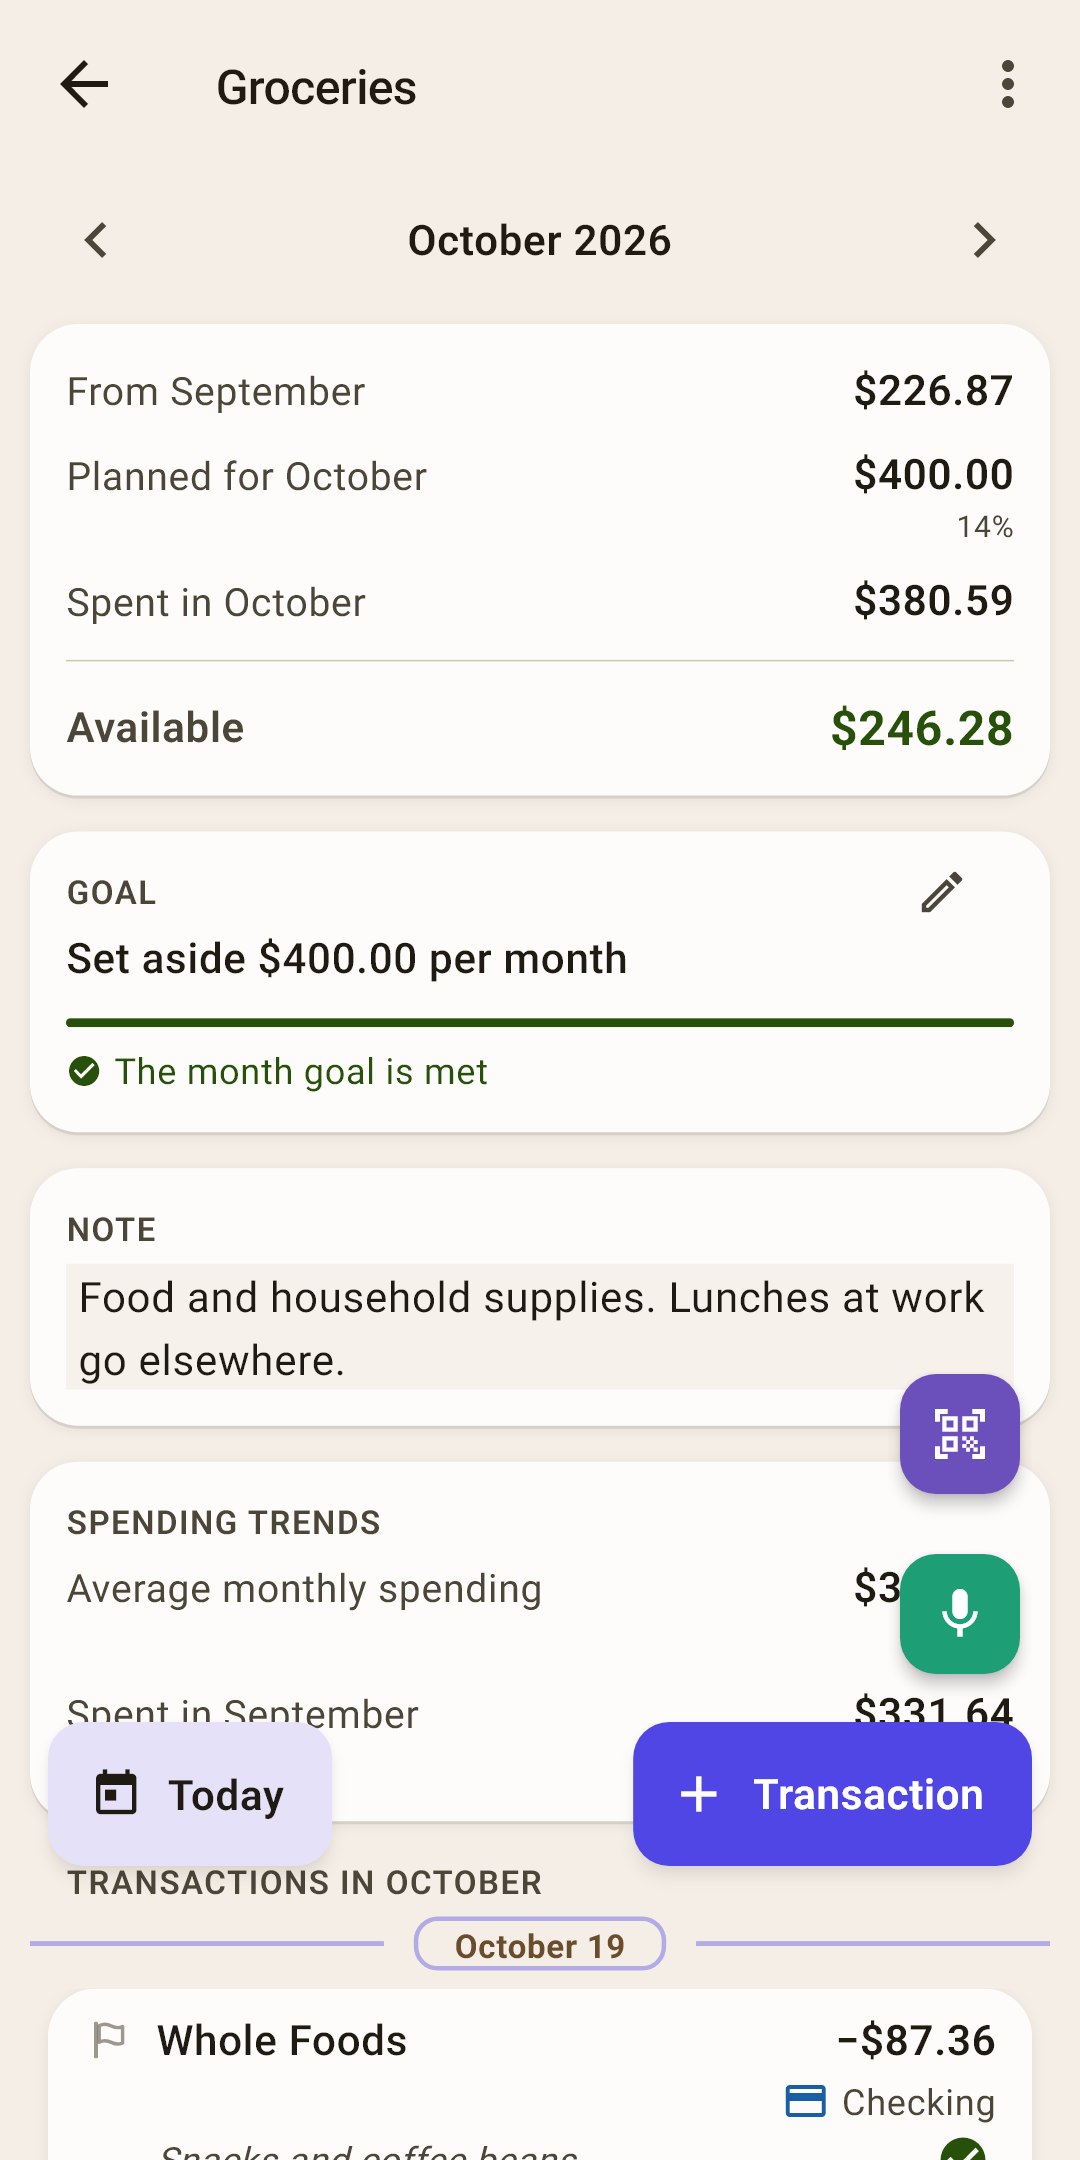
In a past month you see how much there was and how much was spent then. There's no “≈ … a day” row there: the month is over. In a future month you see how much is already set aside ahead.
The “⋮” menu
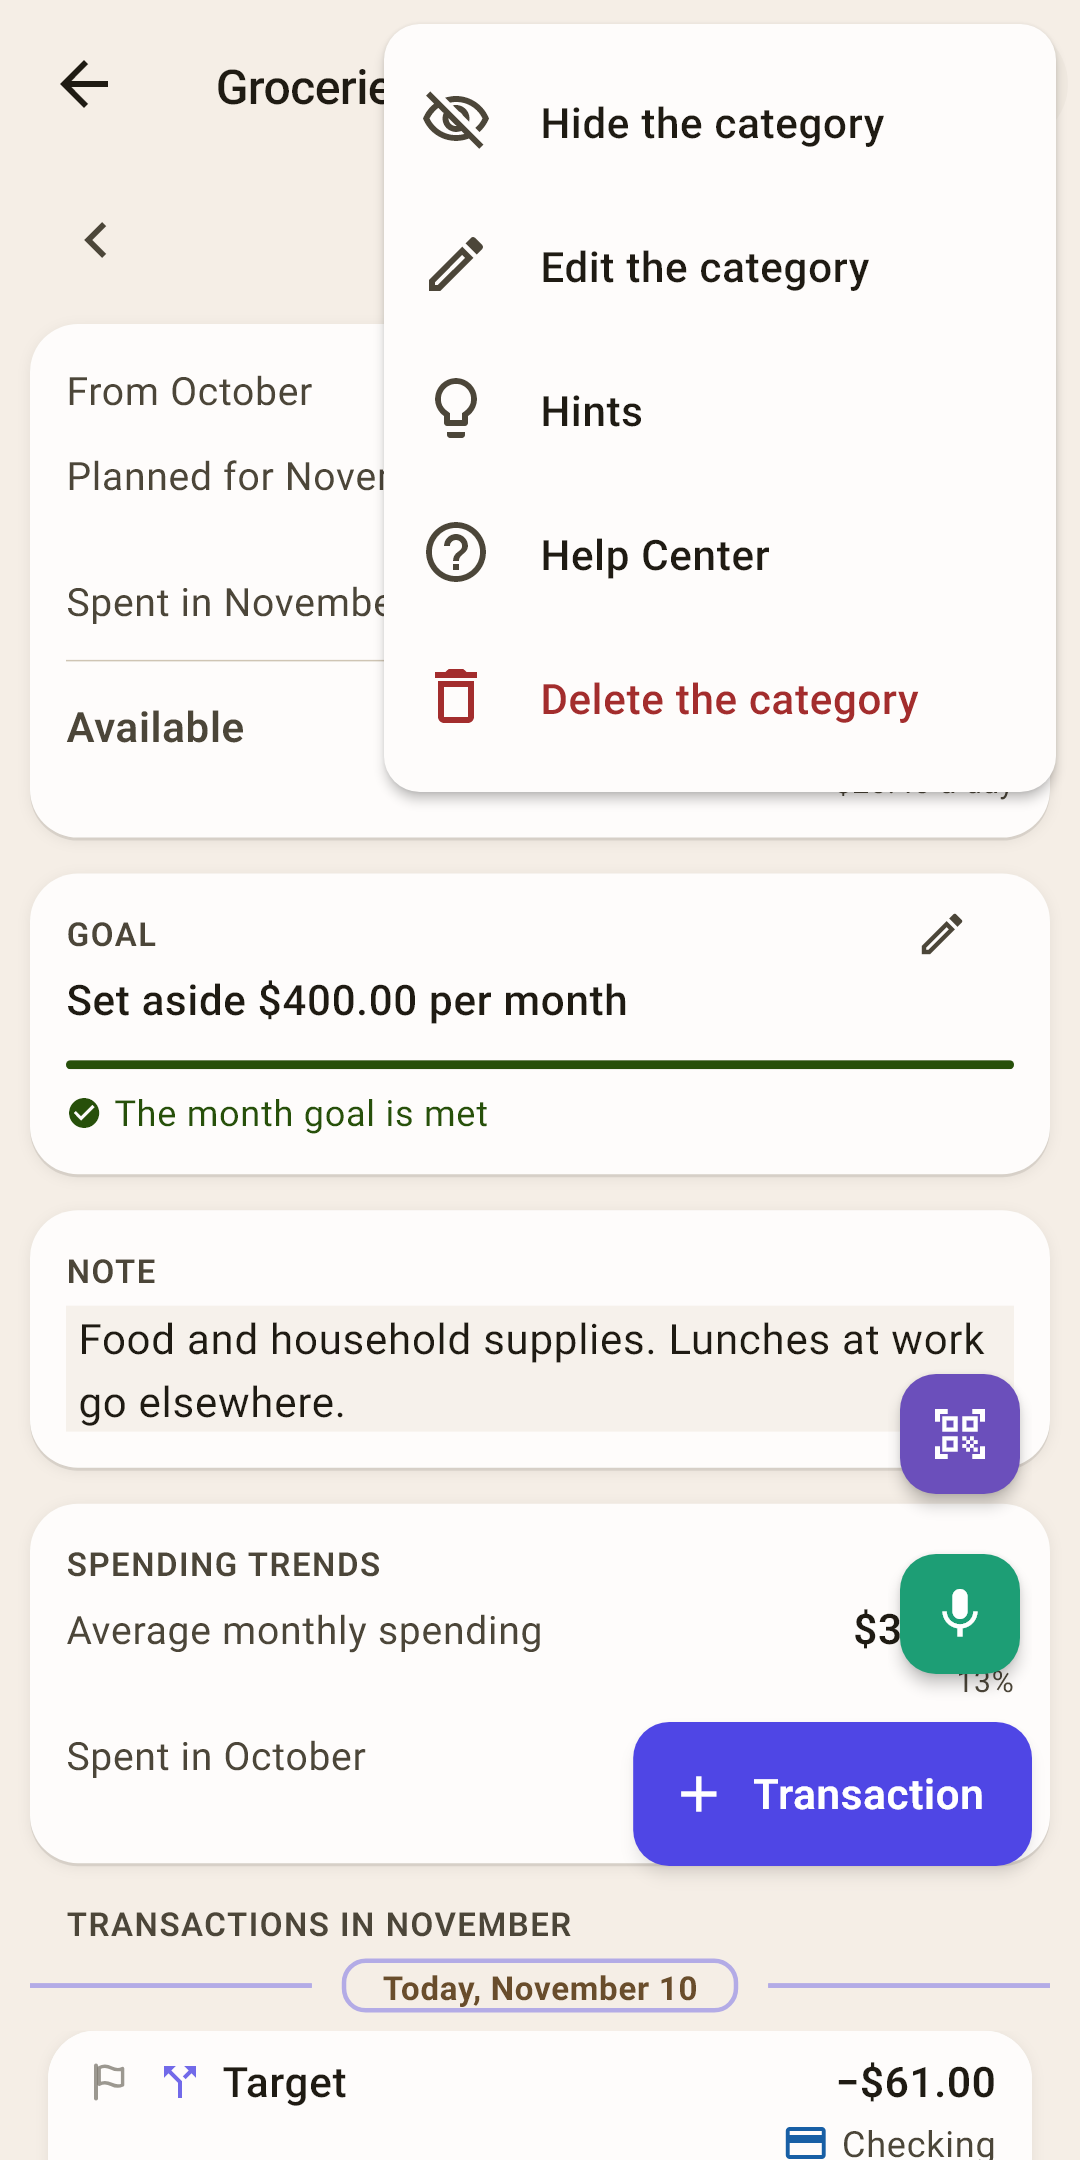
“Hide the category”
The category disappears from “Budget” and from the category list in the transaction form. The money and transactions stay, and it counts in the calculations as before. To bring it back — right here: the item becomes “Show the category”. Or “Budget” → “⋮” → “Hidden categories”.
“Edit the category”
A sheet with the name and a “Group” field. Details — below.
“Hints”
This screen's hints — including the ones you've already closed.
“Help Center”
This article on the website: it opens in your browser, in the app's language.
“Delete the category”
Only if the category has no transactions at all. Then, after the question “Delete the category?”, it disappears, its goal too, and everything set aside in it goes back to “unassigned”.
How it works
If there are transactions, the app says “Cannot delete — there are transactions” and offers “Hide”. A deleted category would vanish from history, and its transactions would be left without an envelope.
Rename and move to another group
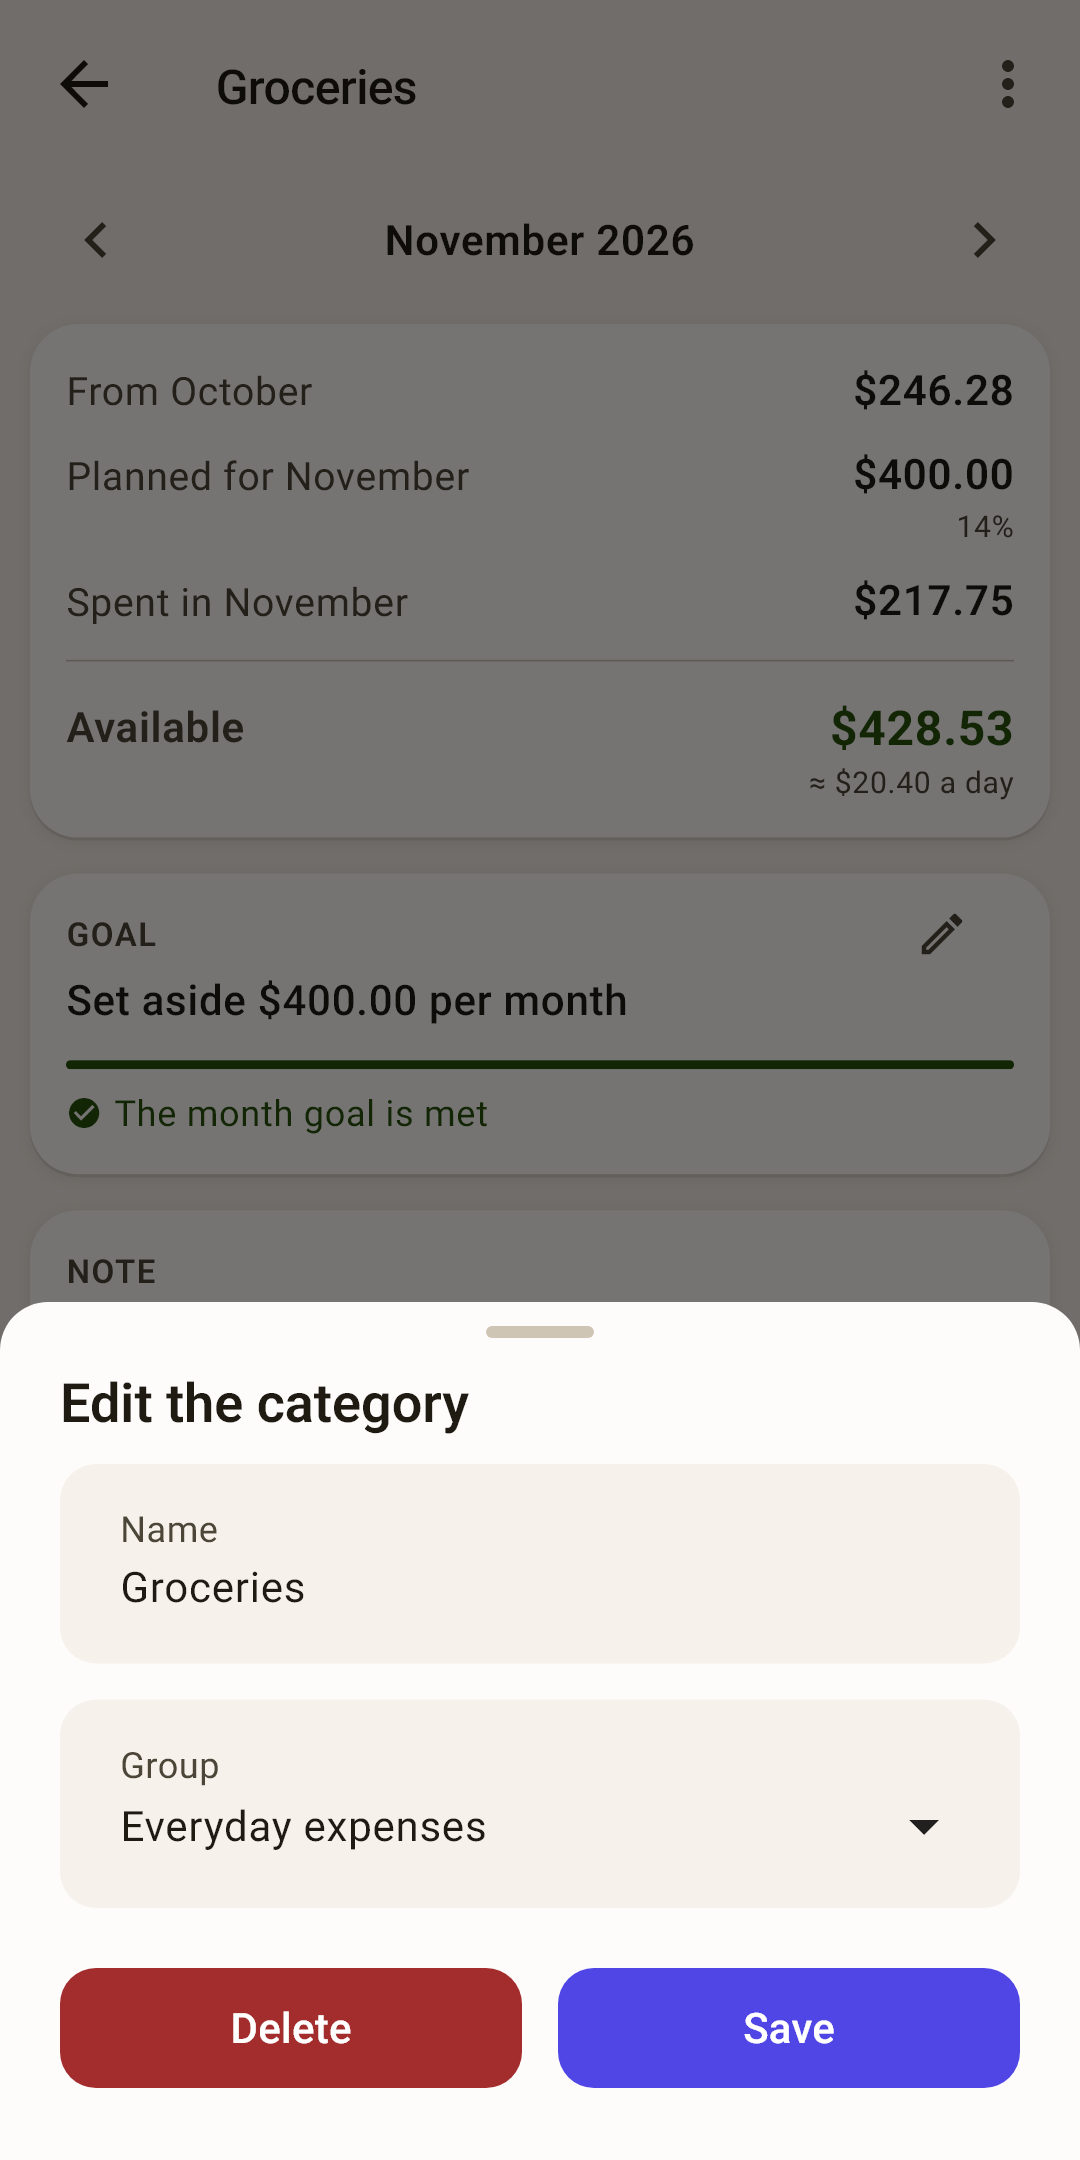
“Name”
The category's new name. The transactions, goal and money stay with it.
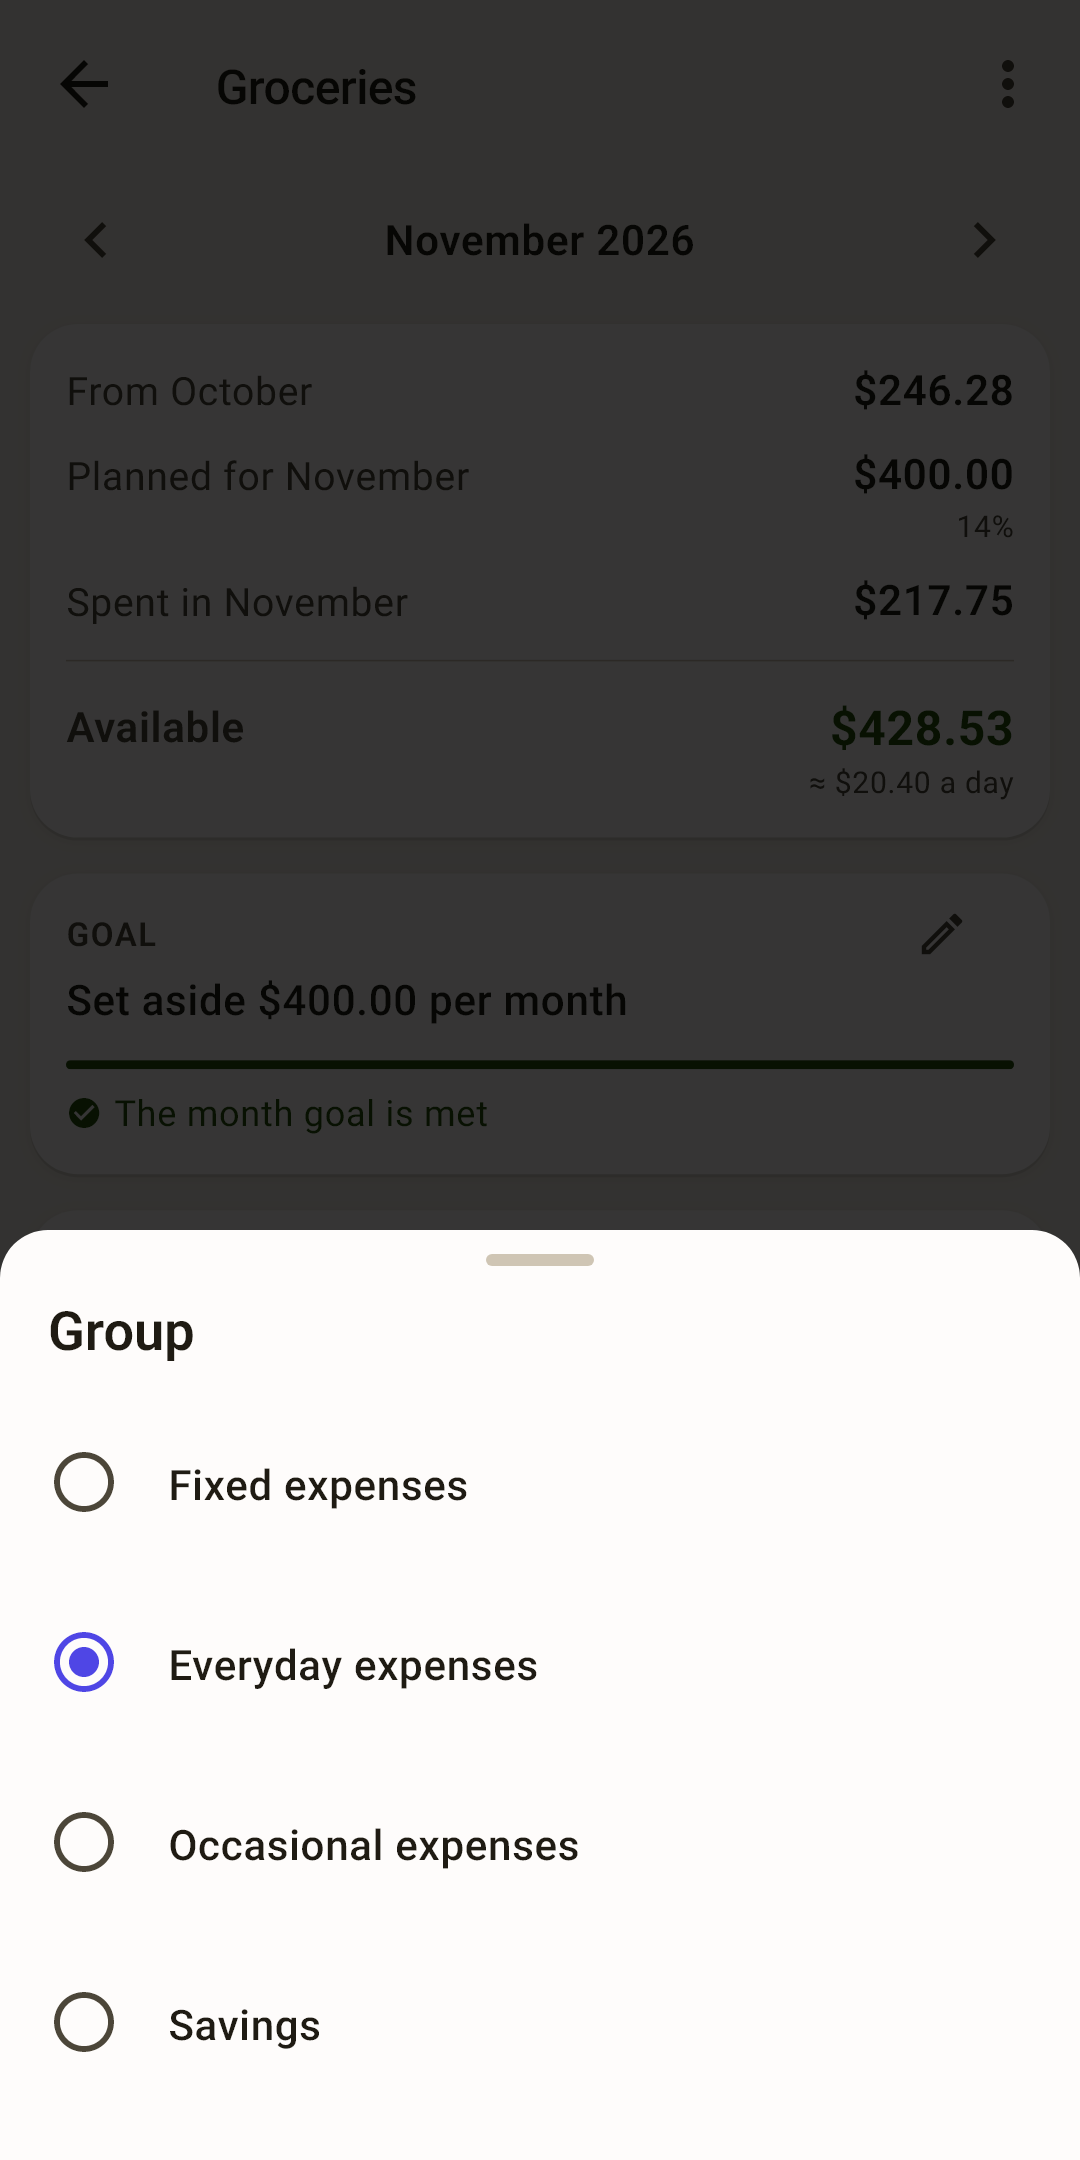
“Group”
Tap it to open the list of groups. Pick another one and tap “Save”: the category moves to the end of that group together with its money and history.
How it works
Categories in the “Card payments” group don't have this field: the app manages their group.
“Delete”
The same as “Delete the category” in the menu.
How to move a category to another group
Open the category: “Budget” → tap its row.
“⋮” → “Edit the category”.
Tap the “Group” field and pick a group.
“Save”.
You can do the same right on “Budget”: swipe the category row left → “Edit”.
On a tablet
On a tablet in landscape, tapping a “Budget” row doesn't take you away from the table: the category's summary, goal, note, trends and transactions appear on the right. The month there is the same as the table's; it has no arrows of its own.
The panel has no “⋮” menu. To hide, rename or delete a category, use its screen: turn the tablet upright and tap the row, or open the category from “Overview” or from “Reports”.