
Why this screen
Picture a stack of envelopes labeled “Groceries”, “Rent”, “Utilities”. On payday you divide money among them. When you spend, you take it out of the right envelope. An envelope is empty — there's no more money for that this month, unless you move some over from another one.
The “Budget” screen is that stack of envelopes. Each row is an envelope (in the app it's called a category), and the amount on the right is how much is in it now. There's one main rule: hand out all your money to envelopes until “All assigned” appears at the top.
Divide up a paycheck
Money came in — “unassigned” appeared at the top. Hand it out to the envelopes.
Check before buying
“Can I afford new sneakers?” — look at the amount next to “Clothing & shoes”.
Clear the red
Spent more than you set aside? Move money over from another envelope.
What's where on the screen
Tap any screenshot to open it full screen.
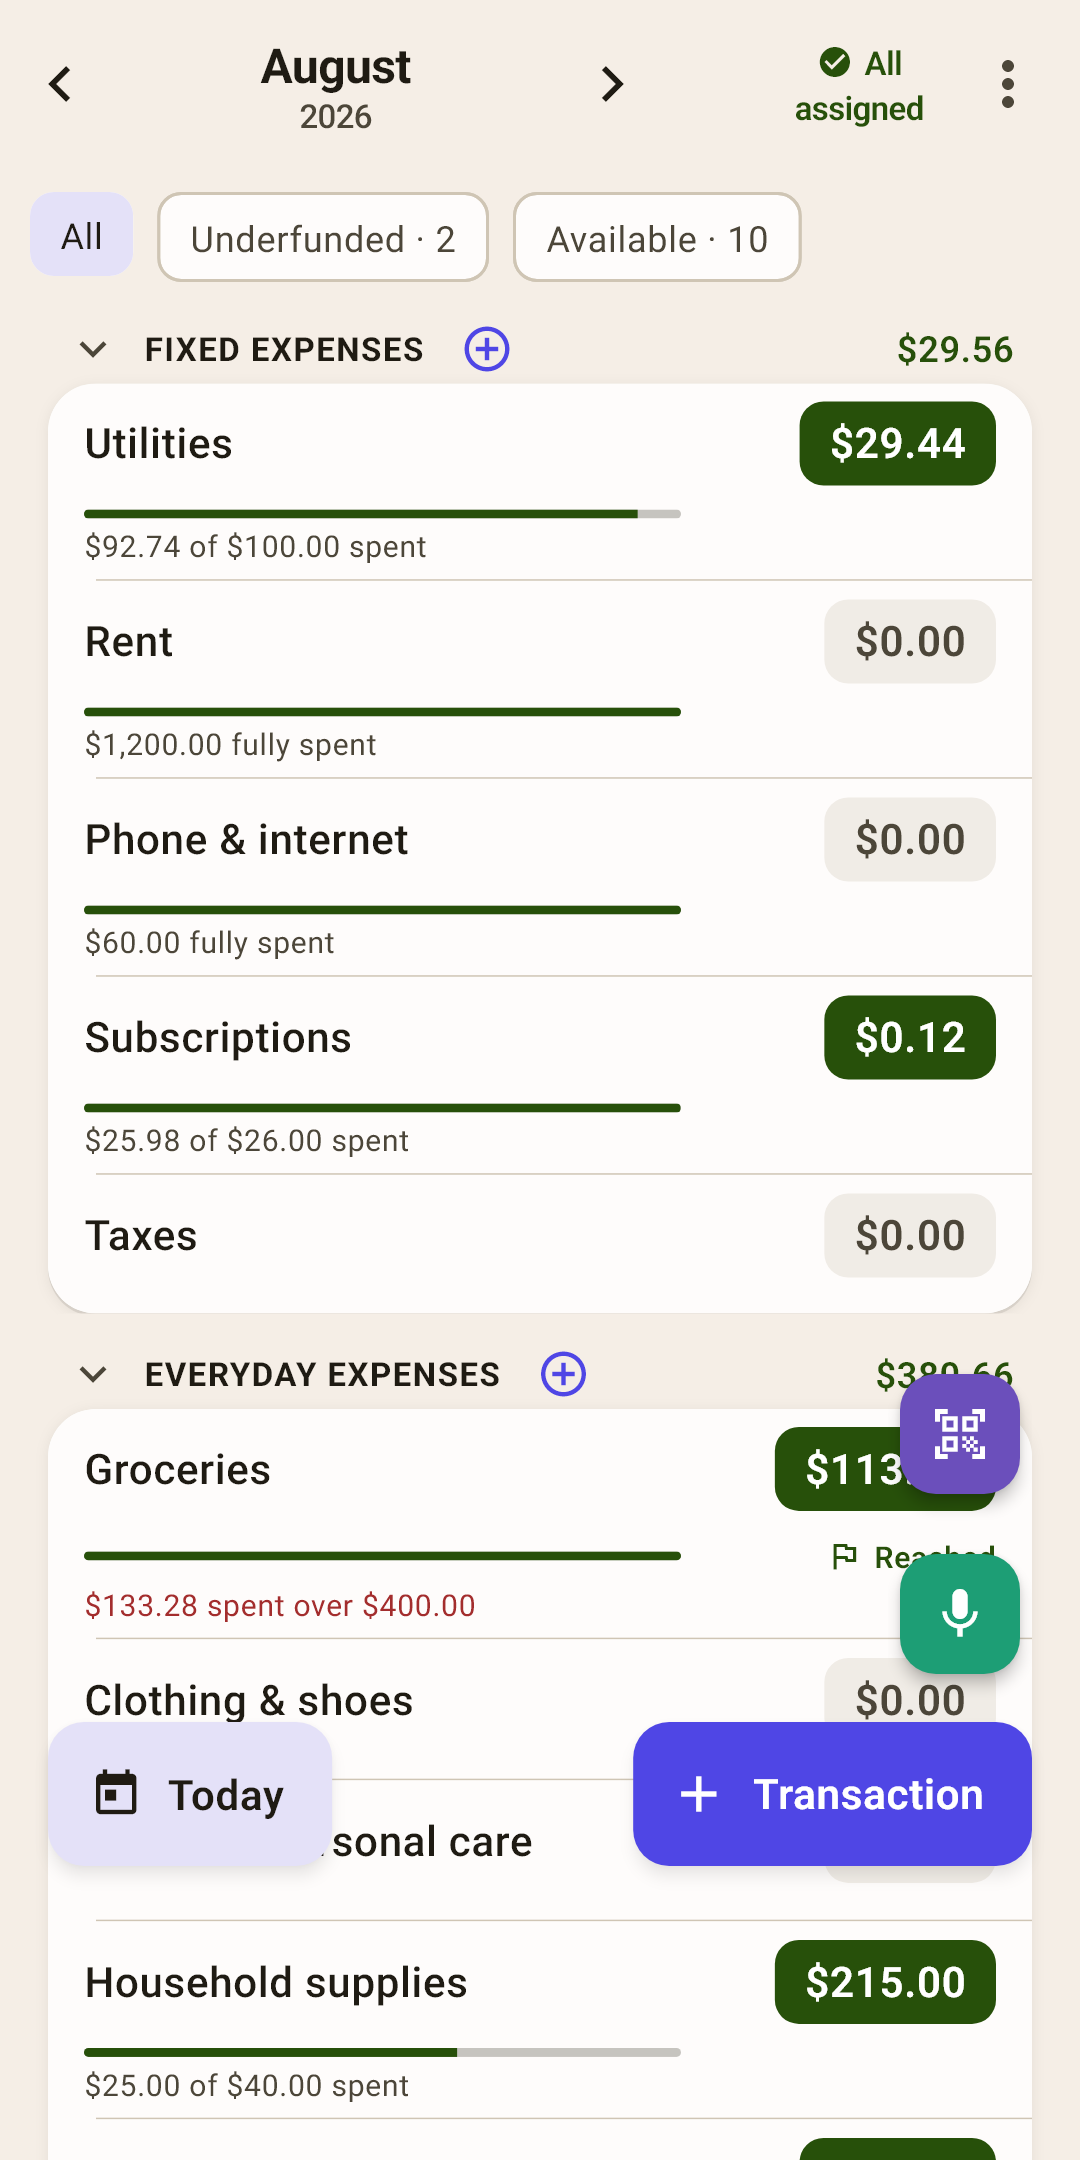
Month — which month you're dividing up right now.
How it works
The “‹” and “›” arrows flip through months. Tap the name to open a month picker, so you don't have to flip one at a time.
You can go forward without limits — and that's useful: in September you can already set money aside for December gifts. Each month has its own envelopes, and whatever's left in an envelope moves to the next month by itself.
“Unassigned” — money that isn't in any envelope yet. The most important number on the screen.
How it works
A paycheck arrives — it lands here. Your job is to hand it out to envelopes until this reaches zero. This spot has three states:
a number on a colored chip — the money is waiting for a job. Tap the chip to open auto-assign: the app offers to divide the money like last month, by average spending, by goals or by your percentages;
“✓ All assigned” — goal reached: every dollar has a job. As in the screenshot;
red “over-assigned” — you've put more into envelopes than you have. Tap it — and take the extra out of envelopes.
The “⋮” menu — goals, order, how rows look. Each item is explained below.
Filter chips — show only the envelopes that need attention.
How it works
“Overspent” — envelopes in the minus. “Underfunded” — envelopes still short of this month's goal. “Available” — where there's money. The number on a chip is how many such envelopes there are; in the screenshot, two are waiting for money to reach their goal, and ten have money.
A chip with zero isn't shown: if nothing is overspent, “Overspent” simply doesn't appear. Tap “All” to bring back the whole list.
Group — a shelf of similar envelopes.
How it works
“Fixed expenses”, “Everyday expenses”… On the right — how much is in all of this group's envelopes. Tap the name to collapse the group out of the way. Press and hold for a menu: rename, add a category or a new group, delete.
Turn on “Percent of income” in the “⋮” menu — and under the group's amount you'll see what percent of the month's income you put into all its envelopes together. You can see right away that “Fixed expenses” take, say, half your paycheck, and “Everyday expenses” get a third. The percent counts every envelope in the group, even if the group is collapsed or some envelopes are hidden by a filter.
⊕ next to a group — a new envelope in this group.
Category — one envelope.
How it works
Tap the row to open the category screen: all spending from this envelope for the month and trends over past months.
You can swipe the row left or right with your finger — to rename it, move it to another group or delete it. How exactly — in the section “What you can do with a row”.
The amount on the right — how much is in the envelope now. Its color is the screen's main hint.
How it works
Green — there's money, you can spend.
Gray 0.00 — the envelope is empty. For rent you've already paid, that's normal.
Red, with a wallet icon — you spent more than there was. This minus will eat next month's money.
Yellow, with a card icon — also a minus, but you paid with a credit card: your card debt grew, and the budget's money wasn't touched.
How to put money into an envelope
Tap the amount on the right.
A dialog with a keypad opens. It shows not the balance but how much you've already set aside in this envelope this month.
Type the new amount — the first digit replaces the old one. Want to add to it instead? Tap “+”, type 35 and “=”.
The envelope has a goal? Tap “To goal: …” — the needed amount fills in by itself.
Tap “Done”.
The money comes from “unassigned” at the top — it goes down by exactly the same amount.
How to clear a red minus
Tap the red amount.
The “Overspent: Groceries” sheet opens with two items. “Change the budget” opens the amount keypad for this envelope, to top it up from “unassigned”. “Cover from another category” moves money from other envelopes; more on that below.
Tap “Cover from another category”. At the top — “To cover: $35”, below — “Where to take the money from”: the first row is “Unassigned”, then every envelope that has money, with each one's balance.
Each row has a “Take …” button: the app has already worked out how much can be taken from there. Tap it next to an envelope you can spare. For example, “Fun & hobbies”.
A keypad opens with that amount. Agree — tap “Take …”. Want to take less? Type your own amount.
One envelope wasn't enough? Take the rest from the next. When the minus is cleared, the sheet says “Overspending covered!”.
Bar — how much of what you set aside has been spent.
How it works
For “Utilities” in the screenshot the bar is almost full: nearly everything set aside for the month is gone. Go past the end, and the bar turns red.
If the envelope has a goal, the bar no longer shows spending but how far the goal is met. You can turn bars off in the “⋮” menu.
In the current month the spending bar has a thin vertical line — today: how much of the month has gone by. If the fill has passed the line, you're spending faster than the month is going, and the envelope may not last to the end of the month. A goal bar has no such line.
“… of … spent” — this month's spending against what you set aside this month.
How it works
“$92.74 of $100.00 spent” for “Utilities”: you set aside $100, spent $92.74. So why does the right side say 29.44 and not 7.26? Because the envelope also held money from past months — the balance moves along with the envelope.
For the same reason “Groceries” has a red line — “$133.28 spent over $400.00” — while the amount on the right is green: the month's plan was exceeded, but the reserve from past months covered the overspending. The envelope is in the plus, all is well.
Goal flag — “Reached” or “… to go”.
How it works
A goal tells an envelope how much it should hold: “$400 for groceries every month” or “$1,300 for vacation by July”. The flag under the amount shows whether the goal is met this month, and if not, how much more to add. Goals are set on the category screen.
“Today” — go back to the current month. It appears when you've moved to another one.
New spending — the same three buttons as on “Activity”. More in the article “Activity”
The “⋮” menu
Goals, envelope order, and what to show in the rows.
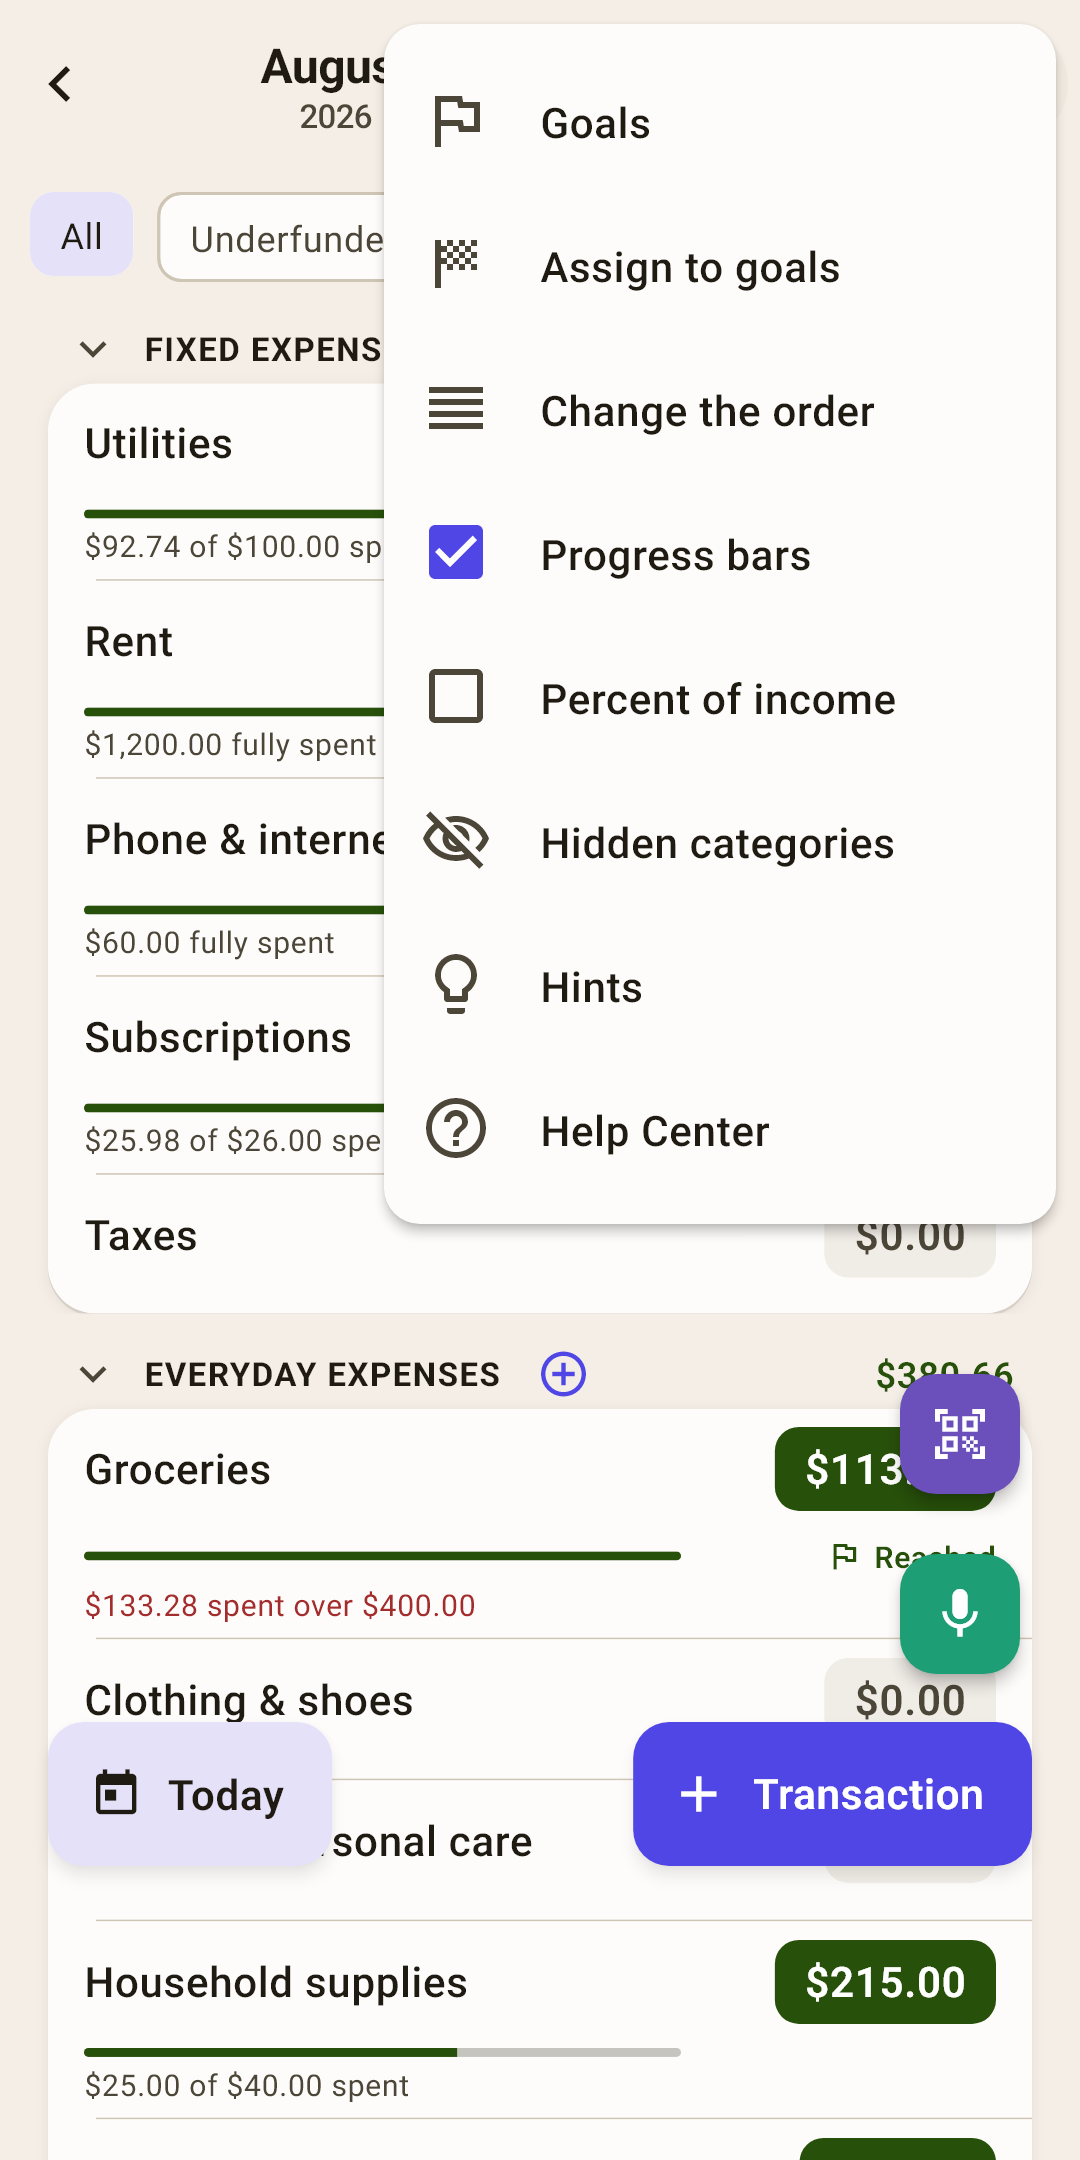
Goals
All the budget's goals on one screen. More in the article “Goals”.
How it works
You see which envelopes are on track and which are short. Tap a goal to change it.
Assign to goals
Top up each envelope by as much as it's short of its goal. More in the article “Goals”.
How it works
The app takes money from “unassigned” and hands it to envelopes with goals — each exactly what's missing. First it shows the plan: what goes where — and only after your “yes” does it assign.
If all of the month's goals are already met, it shows how much each one holds — so you can see why there's nothing to hand out.
Change the order
Rearrange envelopes and groups.
How it works
Handles appear on the rows — drag them. It's handy to keep your most-used envelopes at the top. When you're done, the same menu item is called “Finish sorting”.
Progress bars
Show a bar and a “… of … spent” line under each envelope.
How it works
Turn them off if you want a short list: just names and amounts remain. Envelopes with a goal always keep their bar — it shows the goal.
Right after installing: on.
Hints
All of this screen's hints in one place.
Help Center
This article on the website: it opens in your browser, in the app's language.
What you can do with a row
There are no “edit” and “delete” buttons in the row. Instead, you swipe the envelope's row sideways with your finger — to a button that appears from underneath. The first row of the list shows you once how it looks.
| Do this | What happens |
|---|---|
| Tap the row | The category screen: this envelope's spending for the month and trends. |
| Tap the amount | Put money into the envelope, or on a red one — clear the minus. The steps are in the item “The amount on the right” above. |
| Swipe left | An “Edit” button appears on the right. Tap it to open “Edit the category”: a new name and a “Group” field. Choose another group in it — and the envelope moves there, with all its money and history. |
| Swipe right | A red “Delete” button appears on the left. An empty envelope, without a single purchase, is deleted after the question “Delete the category?”. If there was spending, the app says “Cannot delete — there are transactions” and offers “Hide”: the envelope disappears from the list, and its history stays. To bring a hidden one back — the “⋮” menu → “Hidden categories”. |
| Press and hold a group | The group menu: rename, add a category or a new group, delete the group. |
Envelopes in the “Card payments” group can't be swiped: the credit card itself manages them, and money is set aside in them automatically.