
Why this screen
The “Budget” screen answers the question “how much more can I spend”. “Activity” answers “so where did it actually go”. It's your diary: everything you've recorded is here by day, the most recent day at the top.
Find
“How much was that dinner in March?” — a couple of letters in the search, and there it is.
Fix
Wrong category, an extra zero, a duplicate entry — swipe the row and fix it.
Reconcile with the bank
Mark what has already gone through on the card — and you immediately see what the bank hasn't processed yet.
What's where on the screen
Tap any screenshot to open it full screen.
Search — finds anything by a couple of letters, an amount or dates.
How it works
Type “whole” — the feed keeps only your trips to Whole Foods. It searches everywhere: payee, category, note and amount. “47.55” finds that amount, “milk” finds the note “Milk, eggs, bread”.
The search understands dates the way you write them:
8/15/2026 — a single day;
8/15 — that day in any year: “what did I buy on past birthdays?”;
8/2026 — all of August;
8/2/26-8/10/26 — from and to, both days included. Works with months too: 6/2026-8/2026 — the whole summer.
Between “from” and “to”, a hyphen, a dash or a space will do — the app works out where the boundary is. A plain number, like “8”, isn't treated as a date: otherwise a search for $8 would drown in all of August.
A hash sign turns on tag search: “#vac” — everything tagged “vacation”, “#vac cafe” — only cafes from the vacation. Two tags separated by a space — transactions that have both.
Payees and tags — who you pay most often and how much.
How it works
A separate screen with two tabs. “Payees” — everyone you've paid and who's paid you, with a total for this year (the period changes in the “⋮” menu). This is often where you find out that the “small” trips to the corner store added up to a vacation over the year.
“Tags” — your labels across categories: “vacation”, “renovation”, “gift for mom”. Tap a payee or a tag to open its history. The article “Payees and tags”
The “⋮” menu — everything that changes how the feed looks. Each item is explained below.
Transaction type — only expenses, only income, with one tap.
How it works
Want to see only money coming in? Tap “Income”. “Transfers” are when money just moved between your own accounts: from checking to savings, to pay off a credit card. “Notes” are entries without an amount, reminders to yourself.
Tap the same chip again, and the whole feed comes back.
Date — jump to any day.
How it works
Scrolling six months back with your finger is an acquired taste. Tap the date chip, pick a day in the calendar — and the feed is already there. To get back to today, use the “Today” button at the bottom left.
Flag — a colored bookmark for yourself.
How it works
A flag doesn't calculate anything — it's just a bookmark. Red — “check it wasn't charged twice”, green — “a friend promised to pay me back”. You make up the colors and their meaning.
You can set a flag in the transaction form, or on a dozen rows at once through selection. A gray outline means “no flag”. The flag's shape — a dot, a triangle or a wavy flag — is in “Settings → Appearance”.
Category — which envelope the money left.
How it works
A category is an envelope on the “Budget” screen. A purchase at Whole Foods with the “Groceries” category shrinks the groceries envelope: that's how the budget knows how much you still have for food.
Was the receipt for both food and cleaning supplies? You can split the amount: each part goes to its own envelope, and the row shows a chip for each part. And for a paycheck, instead of a category there's “Available this month”: the money arrived and is waiting for you to hand it out to envelopes.
Account — where it was charged from or where it arrived.
How it works
Checking, cash, a credit card — each account has its own icon and color, so you recognize it without reading. A transfer has two rows, one for each account: in one the money left, in the other it arrived. That's why a transfer's title shows not a store but the other account: “Visa” on checking, “Checking” on the Visa.
Cleared — whether it matches the statement. Optional.
How it works
You recorded a purchase right at the checkout, and the bank processed it a day or two later. The circle keeps you from getting confused: empty — the bank doesn't have this transaction yet, a check mark — it does. Saw the purchase in your bank's app? Tap the circle.
Once a month you can reconcile the whole account. Then the check marks turn into locks: “reconciled, not touching it again”.
The mark is optional: it doesn't affect the budget, it only helps reconcile the account with the bank. If you've never used it, just skip it — empty circles are fine.
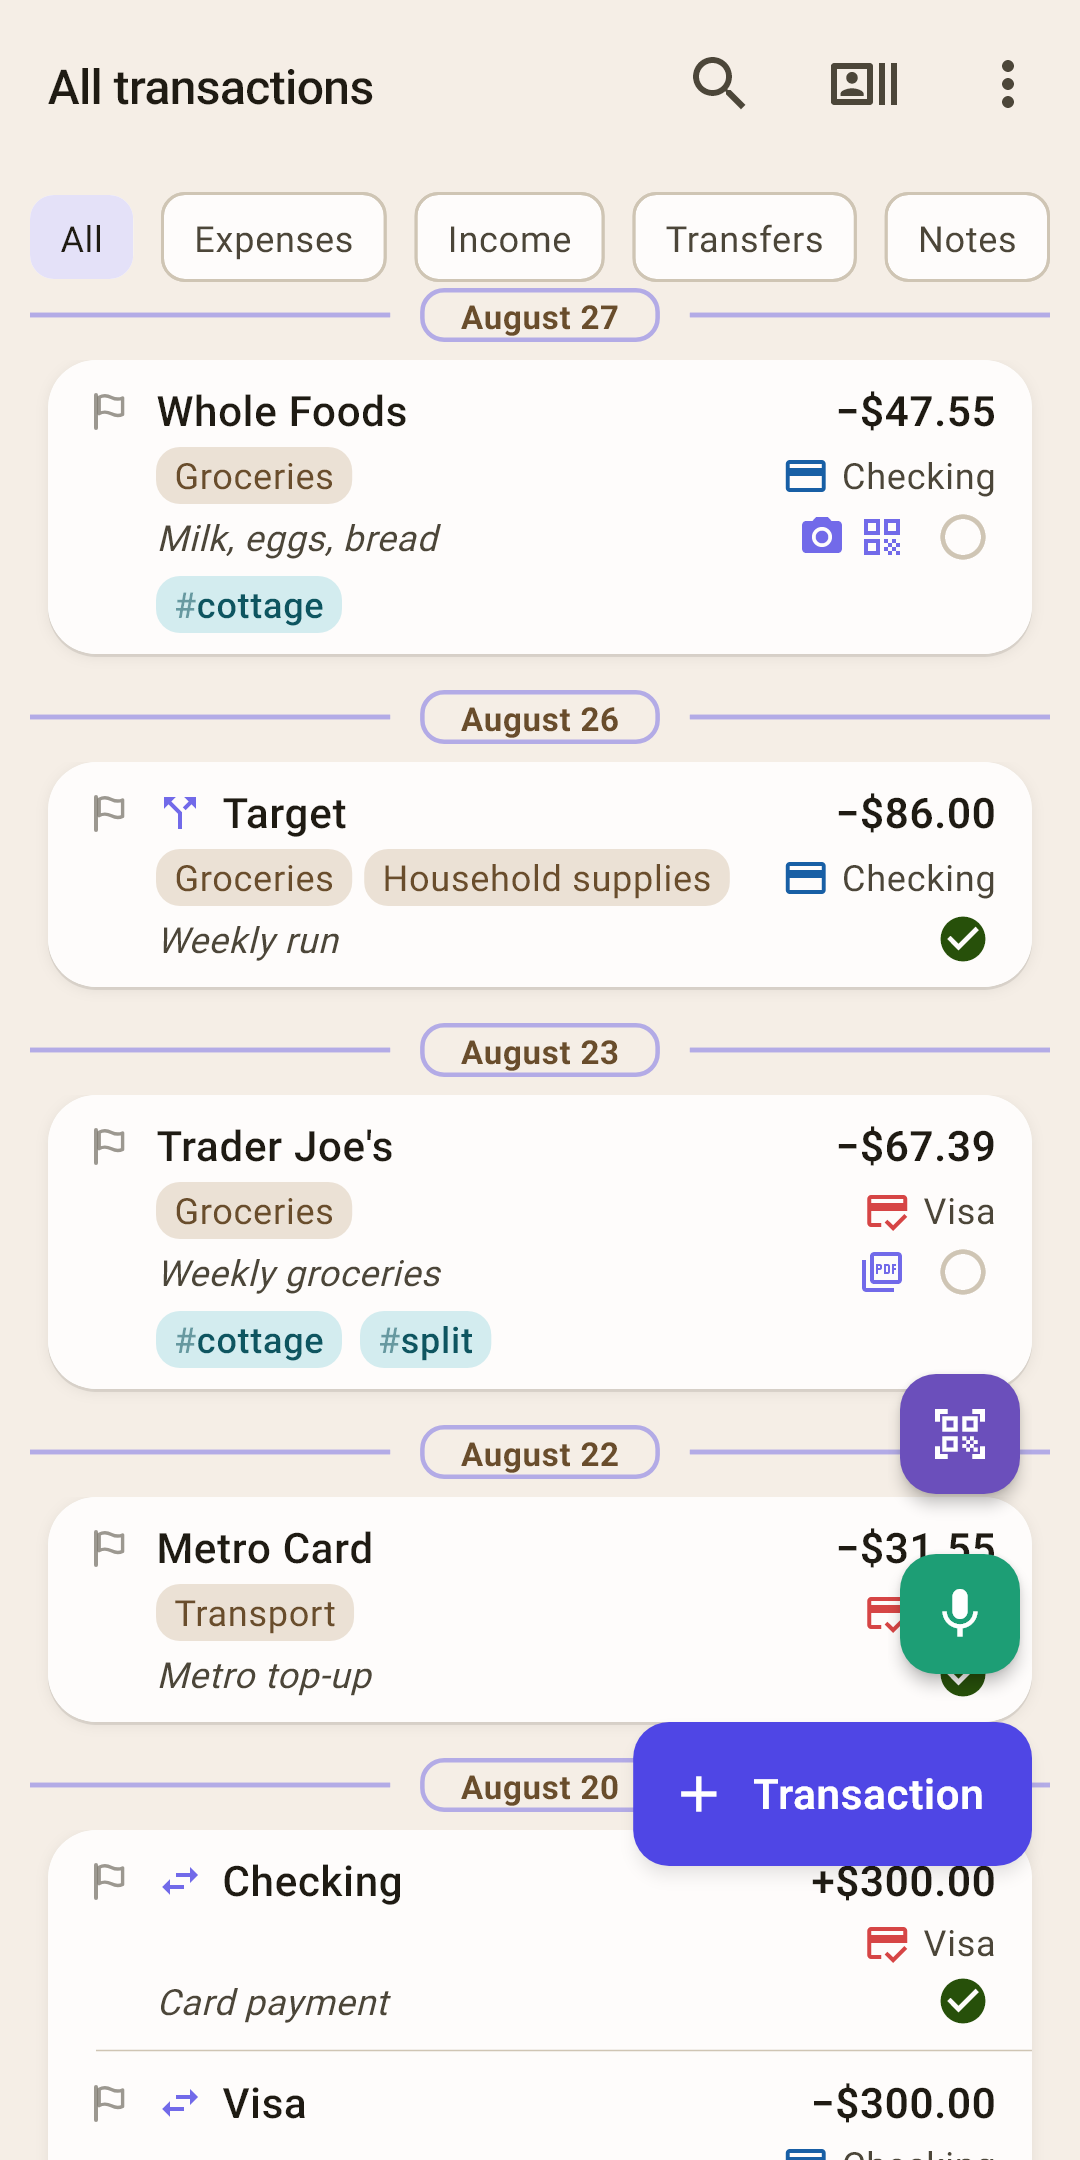
New spending — three buttons in the bottom right corner.
How it works
“+ Transaction” opens an empty form — you fill in the amount, category and account yourself.
Above it are two round buttons so you don't have to type. The purple one is the camera: point it at the receipt's QR code, and the app fills in the amount and date by itself (if it knows your country's receipts). The green one is the microphone: say “coffee 6 from account checking”, and the app fills in the amount and account, plus the payee and category if it recognizes them among yours. Either way the same form opens — check it and save. The article “Transaction form”
Camera and QR icons — a receipt photo and an e-receipt are attached to the transaction. What it is
PDF icon — a file is attached to the transaction: a bill, an invoice, an online store receipt. What it is
Fork icon — the amount is split into parts across different categories. What it is
Hash signs — tags — your “what for” labels; a transaction can have several. What it is
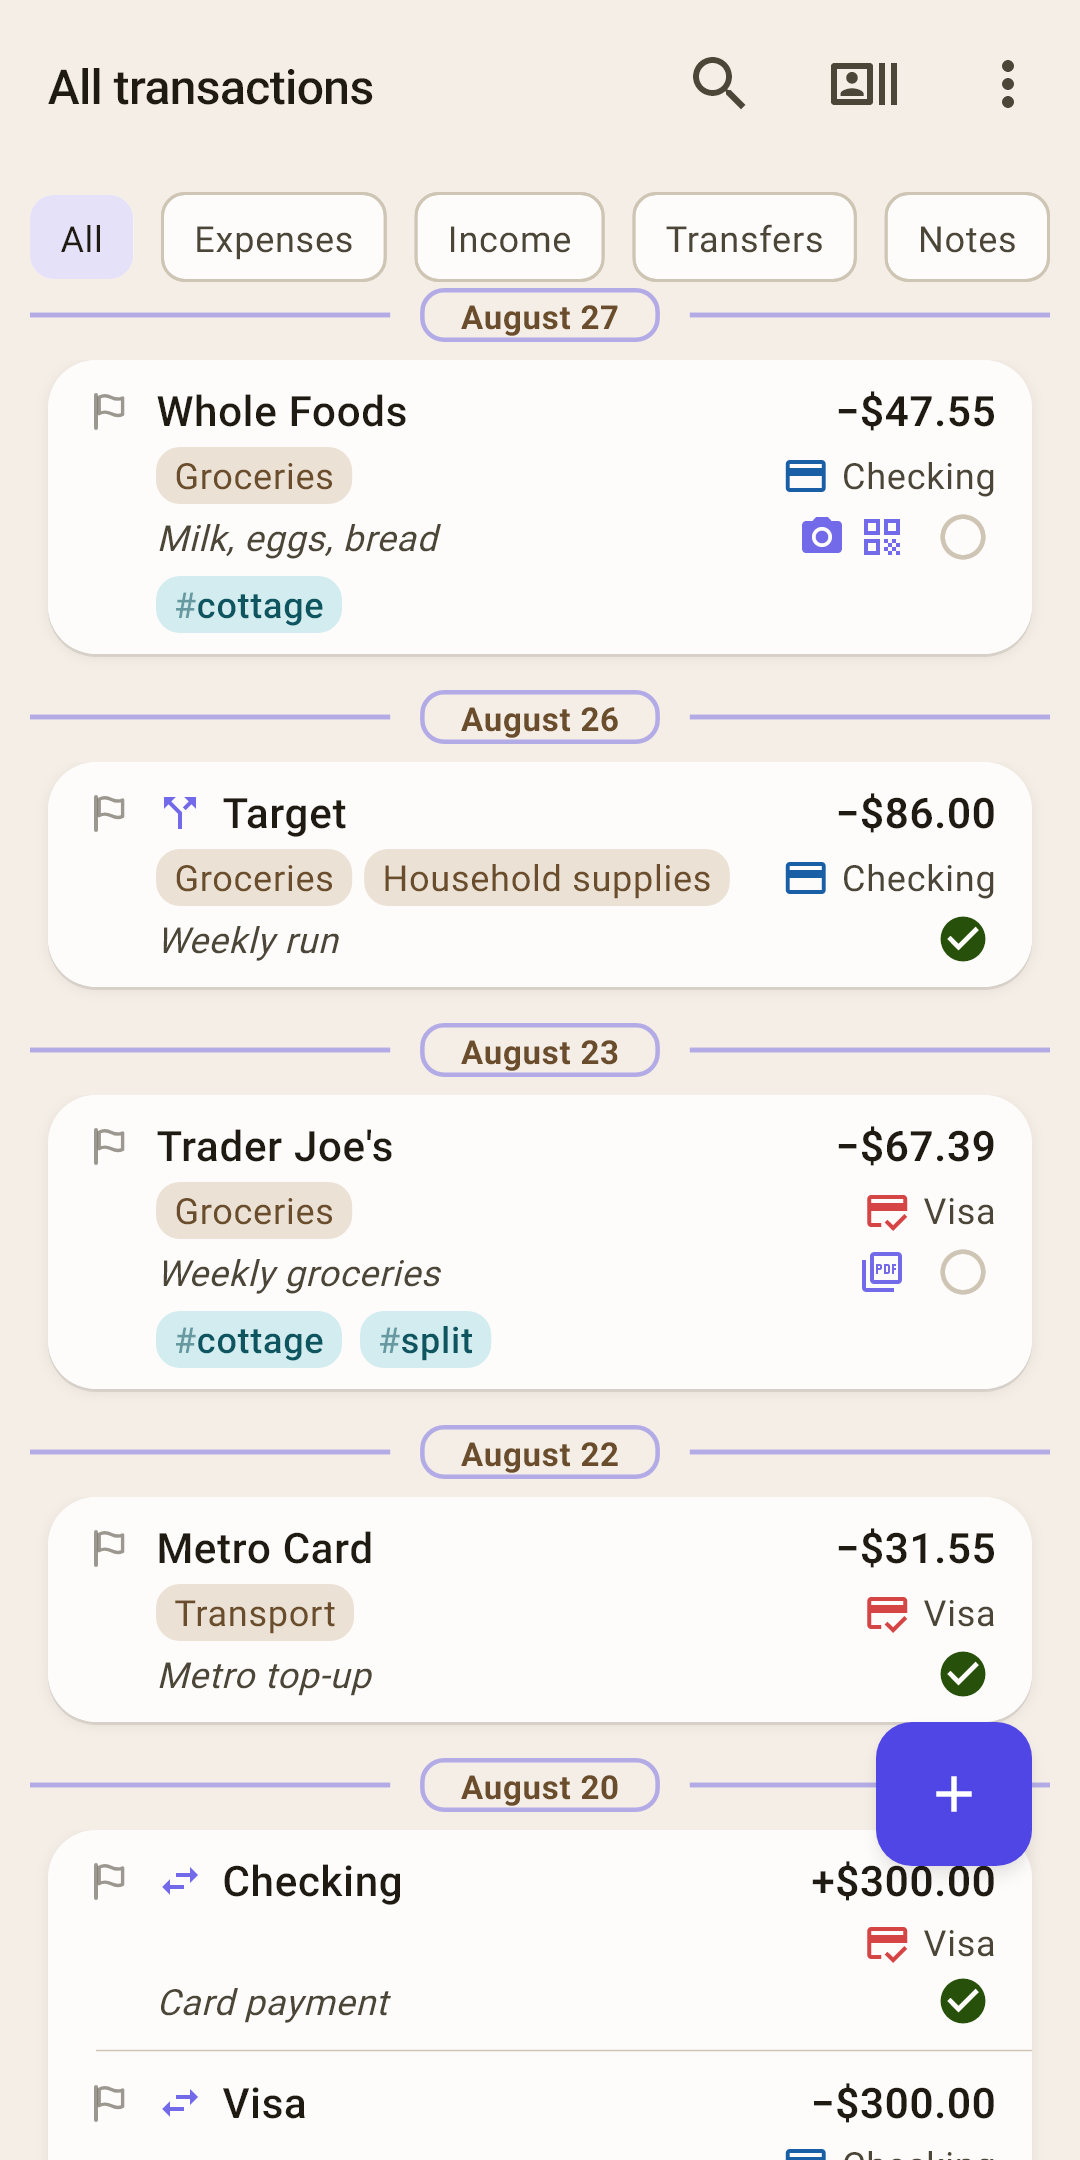
The screen comes in two views
Don't worry if your screen doesn't look like the picture above. The buttons in the bottom right corner fold away so they don't cover your transactions.
 Open the screenshot full size ↗
 Open the screenshot full size ↗
To bring back the camera and microphone, scroll the feed up a little — the buttons expand again.
You can tap “+” in either view: it always opens the new transaction form.
Icons and tags in a row
Small icons next to a transaction say it has something extra: an attached receipt, a file or several categories. They don't do anything by themselves — to see what's attached, tap the row.
No payee — there's a dash “———” in place of the name. It's not an error: the payee just wasn't entered, and the sign of the amount shows the direction.
Camera — a receipt photo
A picture of a paper receipt, a price tag or anything else you'd like to keep next to the purchase.
Don't overdo it. Attach photos to what you'll really need, not to every loaf of bread. Why
How to add it and why
The transaction form has a “Photos and PDFs” field. Tap “Add” and choose “Take a photo” or “Pick from the gallery”. You can attach several photos.
It comes in handy when a month later you need to return something under warranty or remember what was in that $47.55 purchase. The photo is stored on the phone; for it to appear on your other devices too, turn on “Sync photos” in the sync settings.
QR square — an e-receipt
The code or link to the receipt that the register issued.
How to add it and why
Many receipts have a QR code printed at the bottom — you can use it to find the receipt in the store's or tax service's system. The transaction form has an “E-receipt (URL or code)” field: paste the link there, or tap the scanner icon and point the camera at the QR code.
If the app knows your country's receipts, it also checks the receipt against the form: it fills in the amount if you haven't typed it yet, and if the amounts differ, it tells you and offers to fix it. The scanner doesn't change the date in the form. A receipt from an unfamiliar country is simply saved as is — and still comes in handy: in the transaction card you can copy the code and open the link.
“PDF” sheet — an attached file
A bill, a utility invoice, an online store receipt — anything that arrives as a file.
Don't overdo it. A PDF isn't compressed when added — the file is stored as is. Why
How to add it and why
The same “Photos and PDFs” field in the form: “Add” → “Pick a PDF”. The file sits next to the transaction — no more hunting for the bill in your email or “Downloads”.
Tap an attached PDF — “Open” (in a PDF app) and “Save to file” (a copy to a folder you choose) appear at the bottom.
Every photo has weight
The database itself doesn't get fat from photos: it stores only a link to the file. But the file lives on the phone and, more importantly, goes in full into every backup. By default up to 19 backups are kept — 7 frequent and 12 monthly, on the phone and in the cloud.
So a single 300 KB receipt photo can take up almost 6 MB in backups, and a hundred such photos more than half a gigabyte. If “Sync photos” is on, each one also travels to the cloud and to your other devices. Same with PDFs, except they aren't compressed at all when added.
The rule is simple: attach what you'll need — a warranty card, a receipt for an expensive purchase, a bill for your records. Bread and milk can do without photos. And an e-receipt (QR) weighs as much as a line of text — you can save it for every purchase.
Fork — the amount is split into parts
One purchase — several categories. In the form it's “Split the amount” in the category list; in the transaction card the parts sit under the “Split” heading.
How it works
At “Target” in the screenshot you paid $86 in one payment, but bought both food and cleaning supplies. If you recorded it all in “Groceries”, the groceries envelope would shrink by an extra $25, while “Household supplies” would stay untouched — and the budget would start lying.
So the amount is split: $61 to “Groceries”, $25 to “Household supplies”. In the feed such a transaction has a chip for each part, and its card has a “Split” section. You can split the amount in the transaction form when choosing the category.
Cash back at the checkout is a split too
You pay $100 by card at the store and ask the cashier for $30 in cash. The bank shows one charge for $100, but really two things happened: $70 went on groceries, and $30 just moved from your card into your wallet.
Record a $100 transaction from the “Checking” account and split the amount.
The first part — $70, category “Groceries”.
The second part — $30: in the category picker, scroll to the “Transfers” section and choose “Transfer: Cash”.
The feed shows a “Transfer: Cash” chip, the “Cash” account goes up by $30, and the groceries envelope shrinks by exactly $70. Record it all in “Groceries”, and the budget will think you ate $30 more, while your wallet shows less than it actually holds.
A line of hash signs — tags
Your labels on top of categories: “#cottage”, “#split”, “#vacation”. A transaction can have as many as you like.
How it works
A category answers “what did I spend on”, and a tag answers “what for”. Milk and bread at “Whole Foods” are “Groceries”, but they were bought for the cottage. Tag them “#cottage” — and later you'll see at a glance what summer at the cottage cost, even though the money went to groceries, gas and building supplies.
“Trader Joe's” in the screenshot has two tags at once: groceries for the cottage, and paid half-and-half with a friend. A transaction can have as many tags as you like.
How to add a tag
In the transaction form, under the note, tap the “Tags” field.
A list opens, with recent tags at the top. Check the ones you need.
The tag you need doesn't exist yet? Type its name in the “Find or create a tag” line and tap “Create tag “…””.
Tap “Done”.
Where to look later
How much was spent under a tag — the “Payees and tags” icon in the header (callout 2), the “Tags” tab. Tap a tag to open its screen: how much went out over all time, by category and by month, and all the transactions.
Find transactions — type “#” and the start of the tag in the search: “#cott” shows everything for the cottage.
Who owes whom — for a tag like “#split”, turn on “Settle up” in the “⋮” menu on its screen. The app will show how much more to collect or to return to break even.
The tag in the row isn't tappable — it's a label, not a button.
There are also: two arrows — a transfer between your accounts; a little calendar with an arrow — a transaction entered from a scheduled payment; a sticky note — a note: an entry without an amount, a reminder to yourself.
The “⋮” menu
Everything here is about how to show the feed. Not a single item changes or deletes your entries — try them without worry.
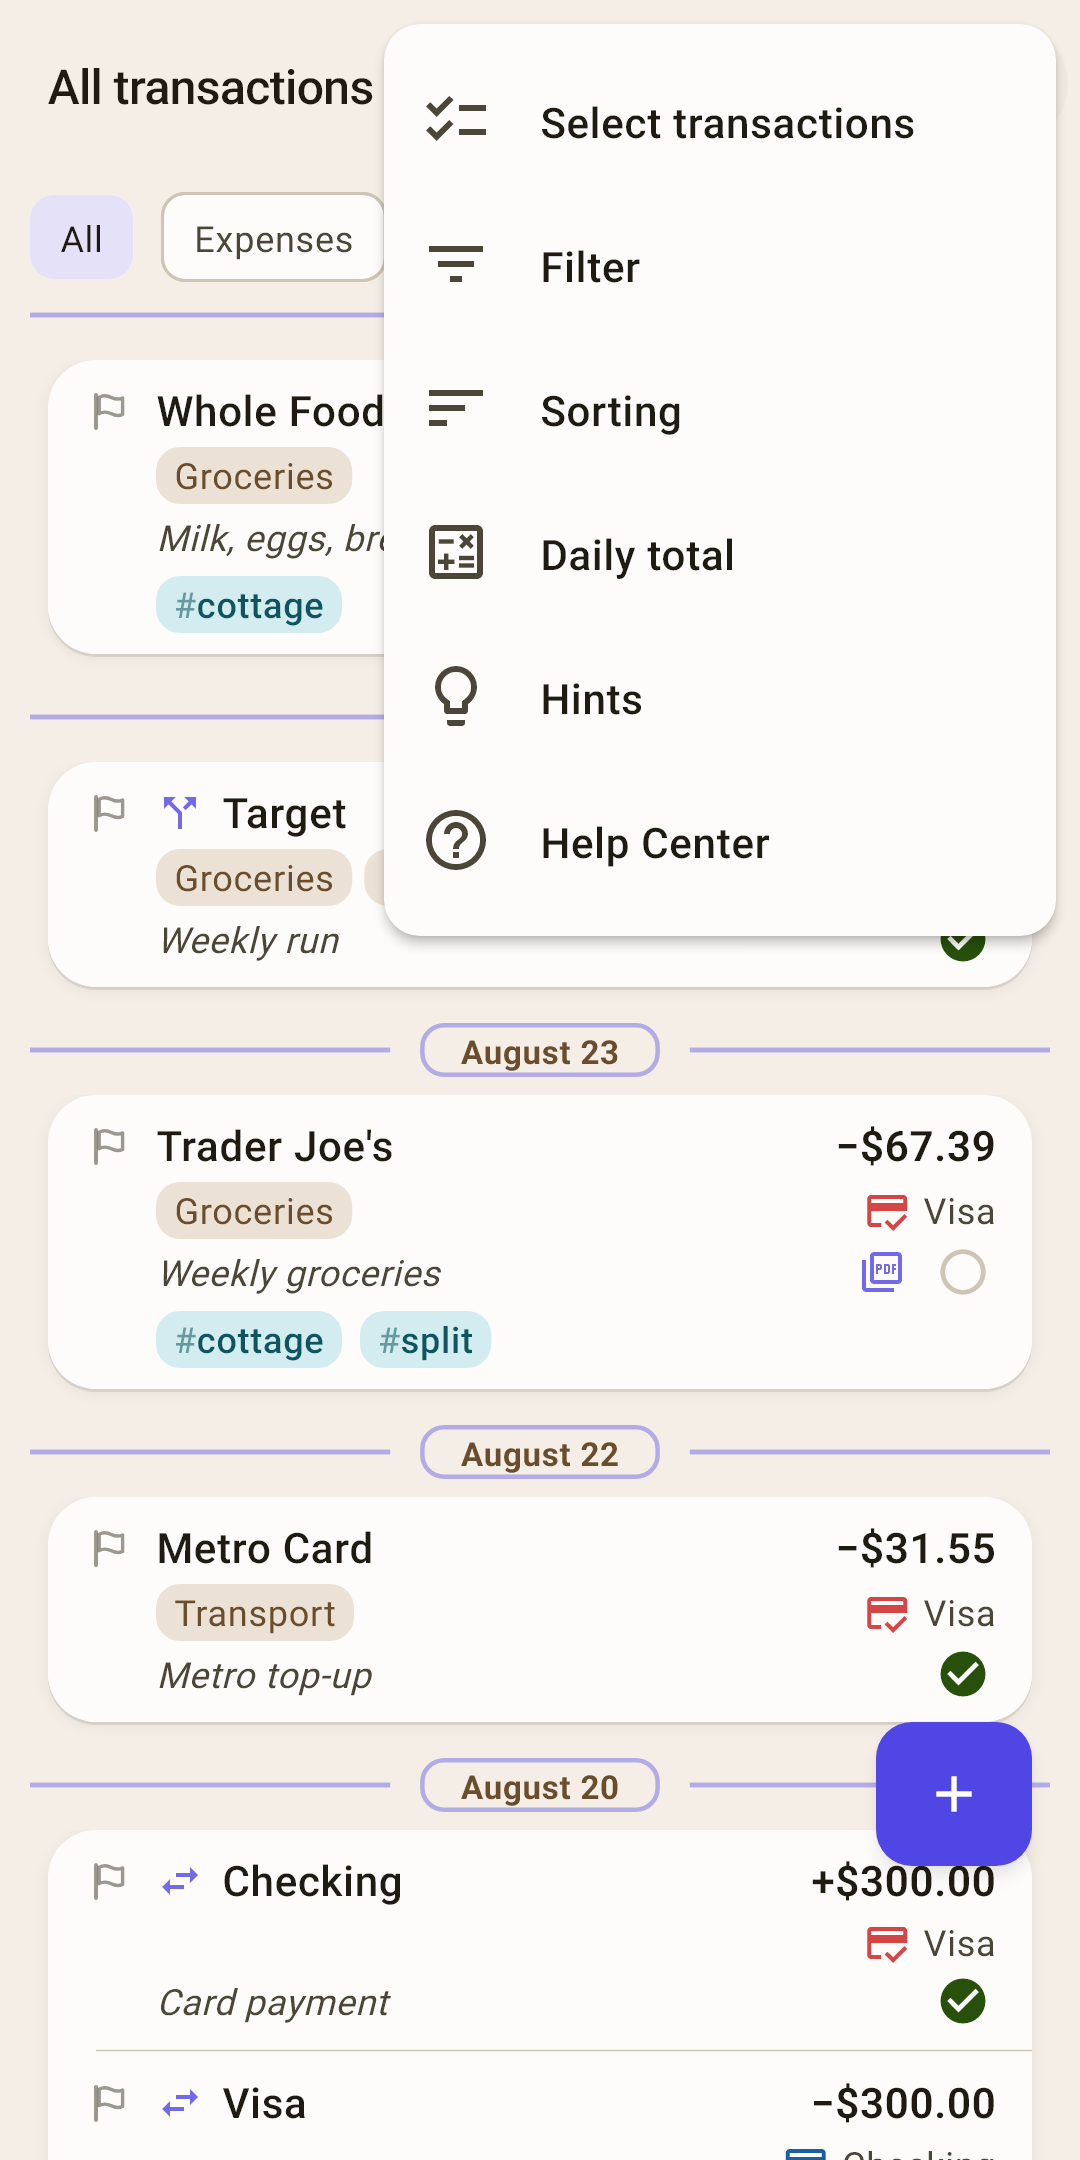
Select transactions
One action on a dozen rows at once.
How it works
Need to put a red flag on a dozen purchases to check them against the statement? You don't need to open each one. Turn on selection and check the rows — their total appears at the bottom (handy for adding up receipts, too). Tap the “⋮” next to the total: you can set a category, a flag or the “cleared” mark for all of them at once, repeat them with today's date, move them to another account, or delete them. The last item, “Clear the selection”, leaves selection without changing anything.
The shortcut: press and hold any row.
Filter
Keep only what you need in the feed.
How it works
For example: “café spending last month, card only”. You can filter by type, period, category, payee, account, amount and tag. Filters add up — each next one narrows the feed.
While a filter is on, a number lights up on the “⋮” — a reminder that the feed isn't complete right now. Otherwise it's easy to think transactions have vanished.
Right after installing: no filters. Resets by itself: when you switch budgets — another budget has its own categories and accounts. See also: the reports filter.
Sorting
How to arrange transactions within one day.
How it works
Days always go as in a calendar — the latest at the top, and that can't be changed. But within a day you can set your own order: big spending at the top (“Descending”), small stuff at the top (“Ascending”), or income first. The chosen order is written right in the menu item — so that a week later you aren't surprised why a day looks “shuffled”.
Right after installing: in the order entered. Also works: on the account screen, in a category's transactions and for a payee.
Daily total
How much went out in a day — right next to the date.
How it works
Turn on “Expenses only” — and to the right of each date you'll see how much you spent that day. A great way to catch the “expensive” days: a Saturday with the market and the movies stands out right away.
“Expenses and income” shows the difference as one signed number: “−100” — the day went into the minus, “+1,400” — a paycheck came in. Transfers between your own accounts and starting balances don't count: they're not spending, the money just moved.
Right after installing: not shown. Also works: on the account screen and in a category's transactions.
Hints
All of this screen's hints in one place.
How it works
In the app, hints appear one at a time — when they're useful, so as not to bury you in everything at once. Here they're all gathered, even the ones you haven't reached yet.
Help Center
This article on the website: it opens in your browser, in the app's language.
What you can do with a row
There are no “edit” and “delete” buttons in the row — so they don't get in the way of reading. Instead, tap the row or swipe it sideways with your finger.
| Do this | What happens |
|---|---|
| Tap | The transaction card opens: everything about it, receipt photos, editing. What's in it |
| Swipe left | “Edit” — straight to the form. |
| Swipe right | “Delete”. Changed your mind? “Undo” stays at the bottom for a few seconds. |
| Press and hold | Selection of several rows turns on — like the “Select transactions” item. |
You tapped a transaction — what's inside
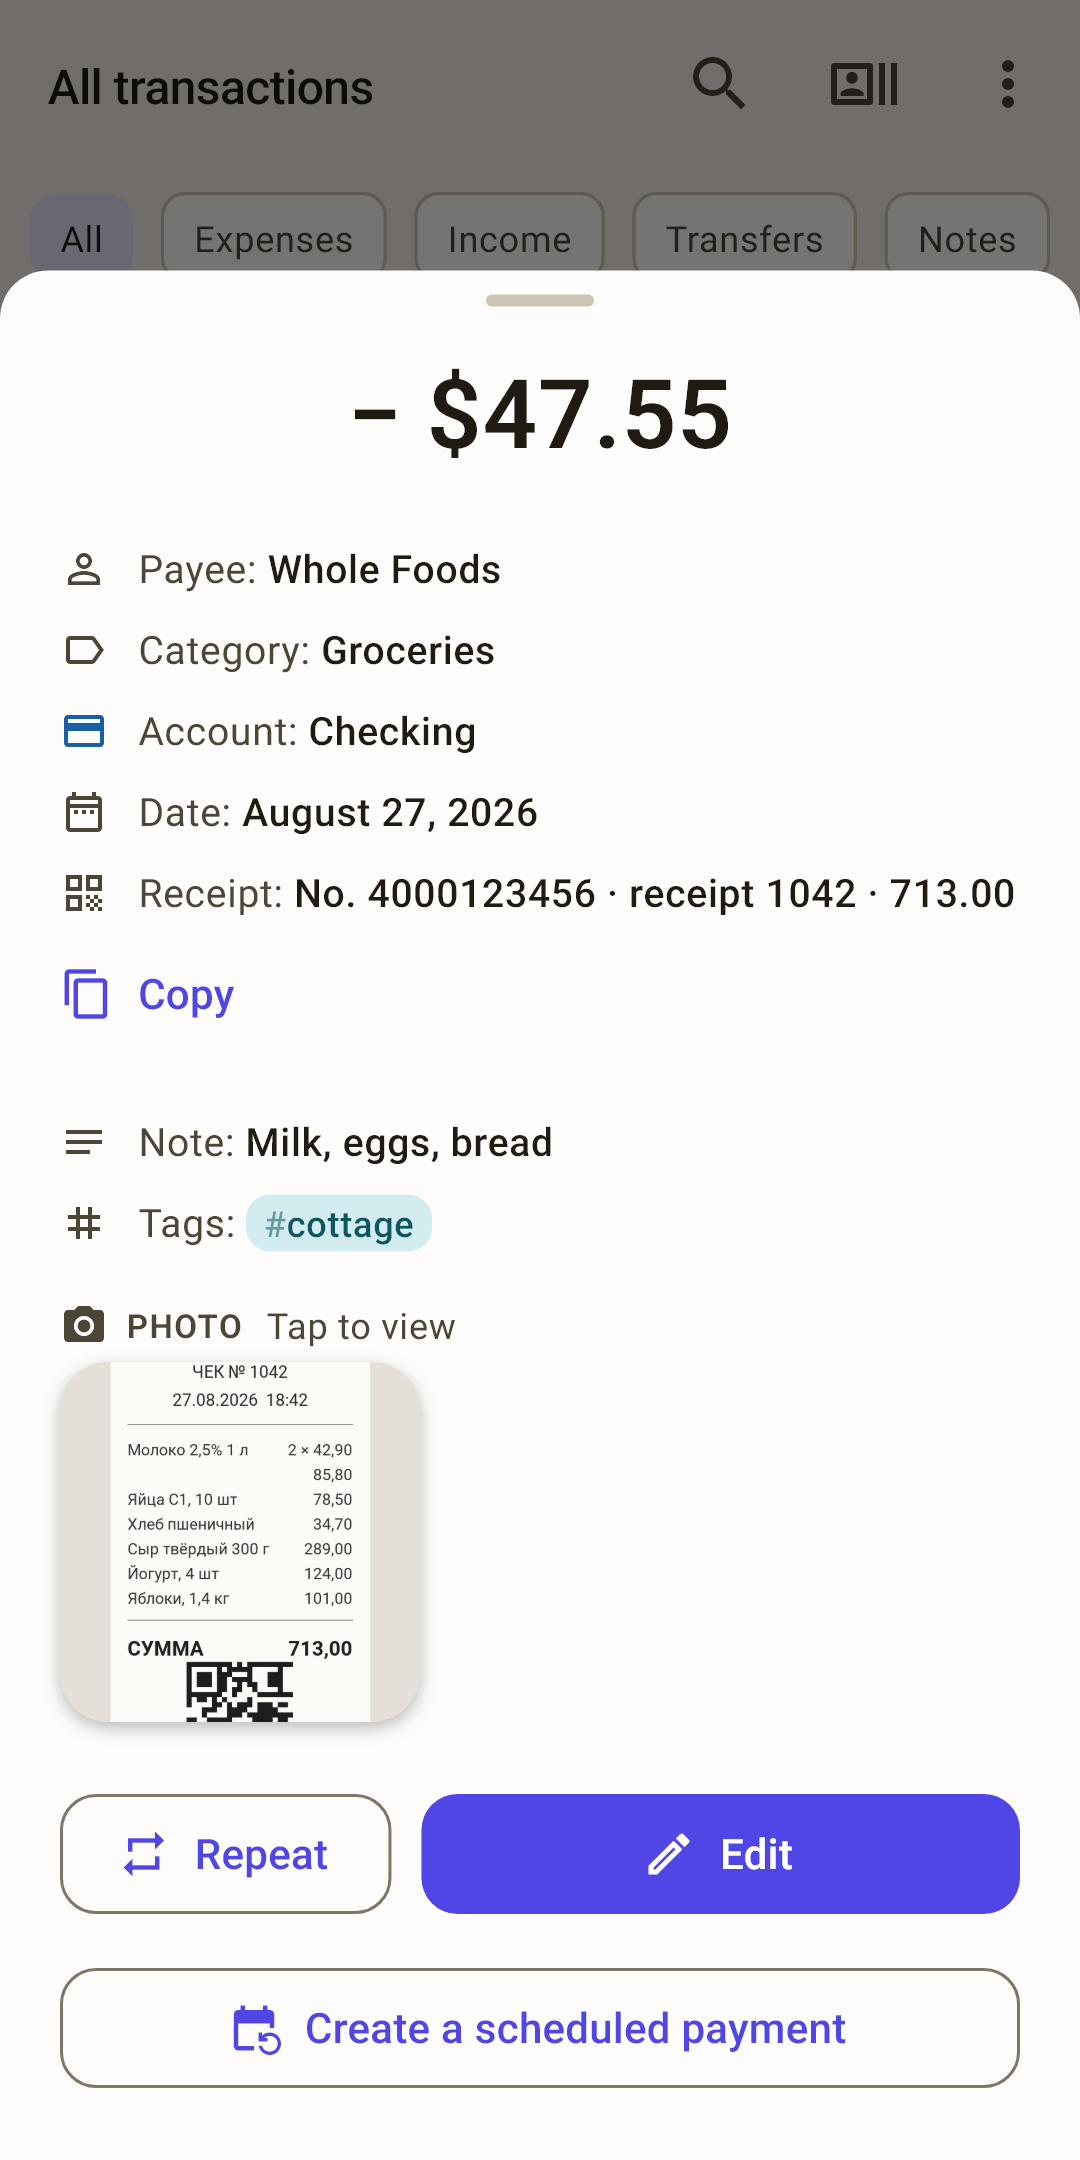
The transaction card slides up from the bottom: everything you recorded about it, on one sheet. Nothing changes until you tap “Edit” — you can look at it calmly.
 Open the screenshot full size ↗
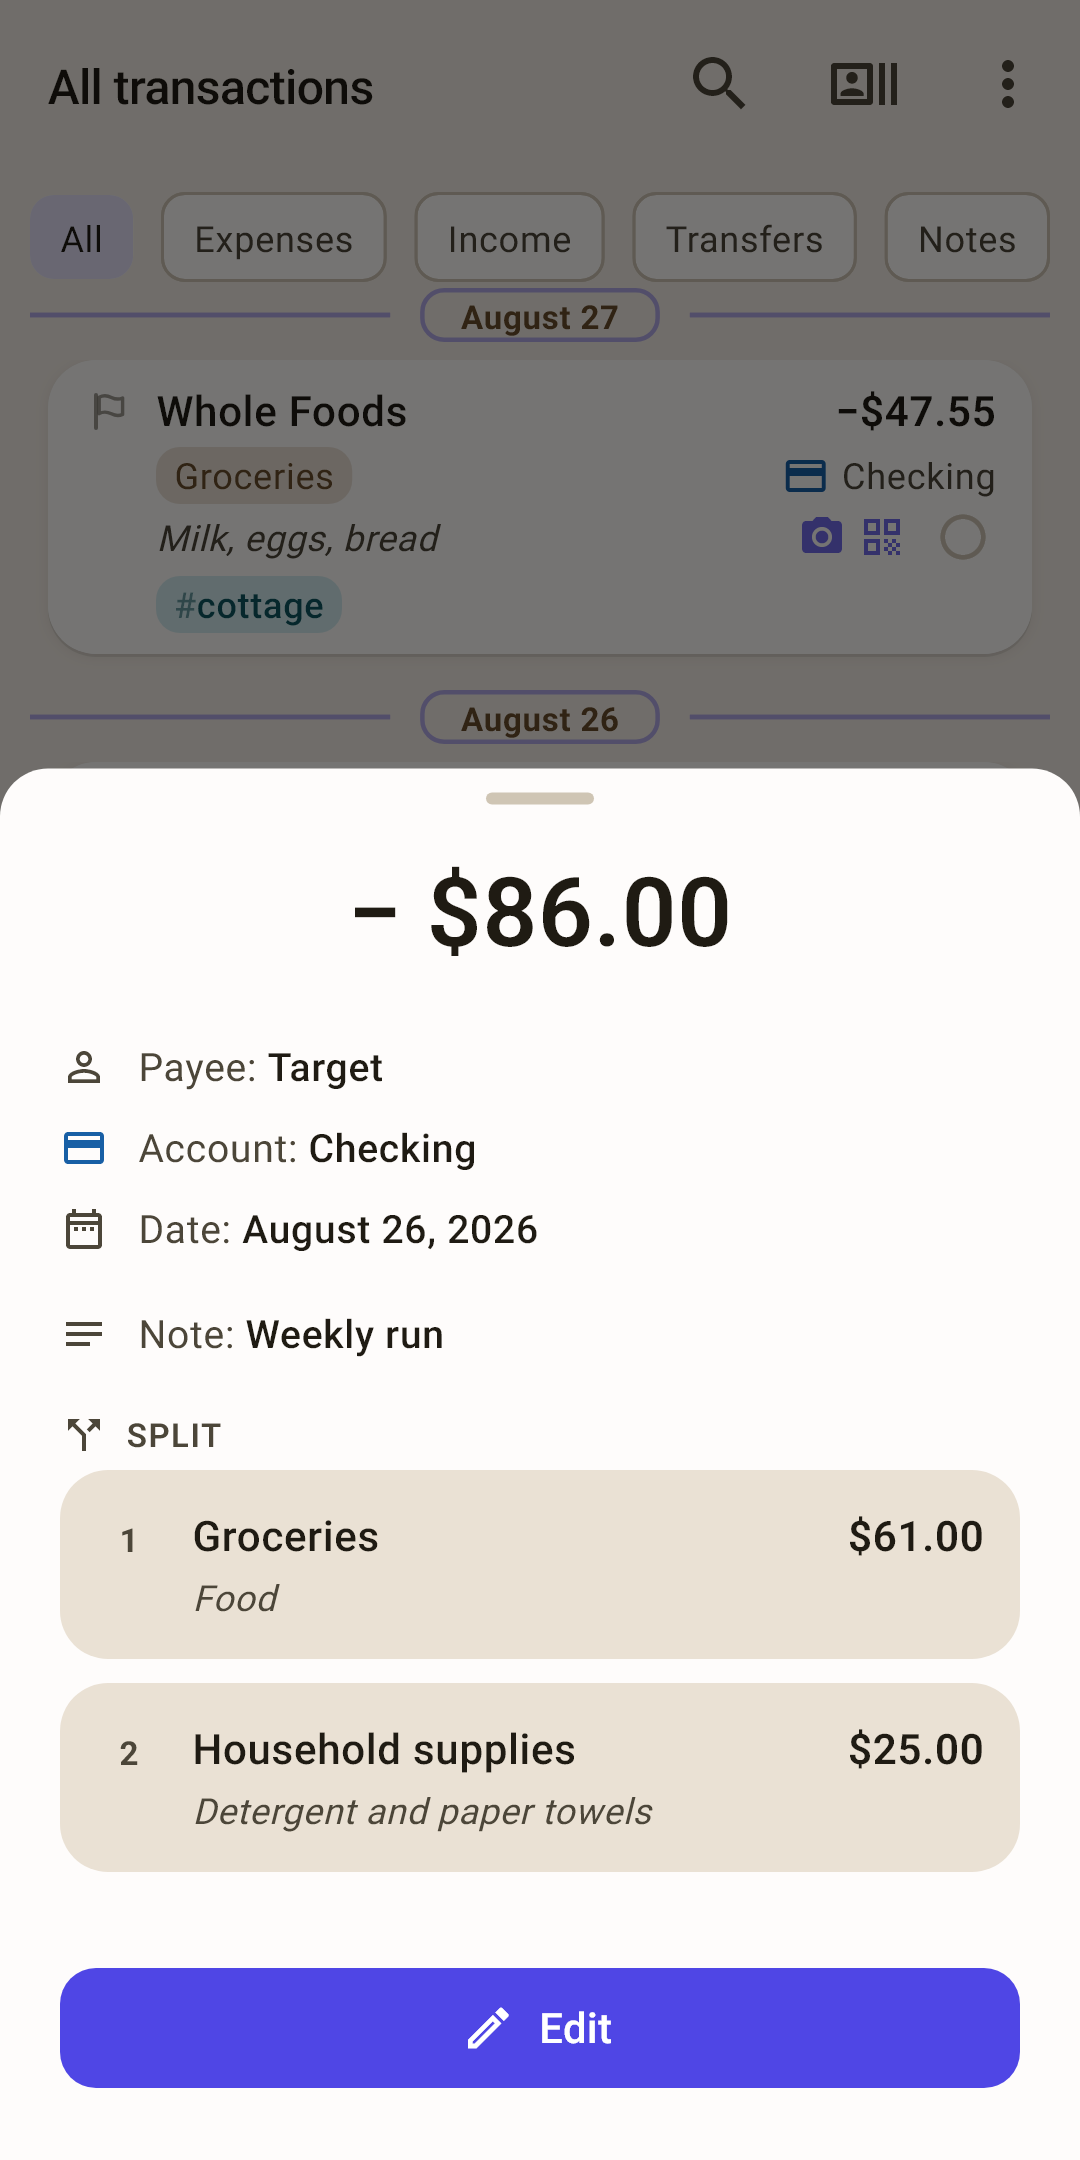 Open the screenshot full size ↗
Big at the top — the signed amount: minus is an expense, plus is income.
Payee, category, account, date — what you recorded in the form.
Receipt — the e-receipt. “Copy” puts the code on the clipboard so you can paste it wherever you need. If it's a link, there's also “Open” — the receipt opens in the browser.
Tags — the transaction's labels as chips, as in the feed: “#cottage”.
Photos — thumbnails of the attached pictures and PDFs. Tap a picture to open it full screen.
Split parts — for a split amount: each part with its own category, note and amount.
Buttons at the bottom
“Edit” — open this transaction in the form and change anything.
“Repeat” — a new transaction with the same payee, category and amount. Handy for what you buy often: coffee, transit, lunch.
“Create a scheduled payment” — make a regular payment out of this transaction: rent, a subscription, a loan. All that's left is to choose how often it repeats.
A split amount and a transfer have only “Edit”: the app won't repeat them half by half.