
Why this screen
This is where you record everything that happens to your money: a purchase, a paycheck, a transfer from one card to another. The faster you record, the more honest the budget — so the essentials of the form can be done right at the checkout, in a few taps.
Open it
“+ Transaction” on any tab. From an account or category screen, the form opens with them already filled in. Even faster — a widget on the home screen.
The minimum
Amount, category and account. The payee, note and everything else are optional.
Not only by hand
The camera above the “+” reads the receipt's QR code, the microphone a phrase like “coffee 6 Fun & hobbies”. Both buttons open this same form, already filled in.
What's where on the screen
This is how the form looks right after you tap “+”. The amount keypad opens right away: you almost always start with the amount. Tap any screenshot to open it full screen.
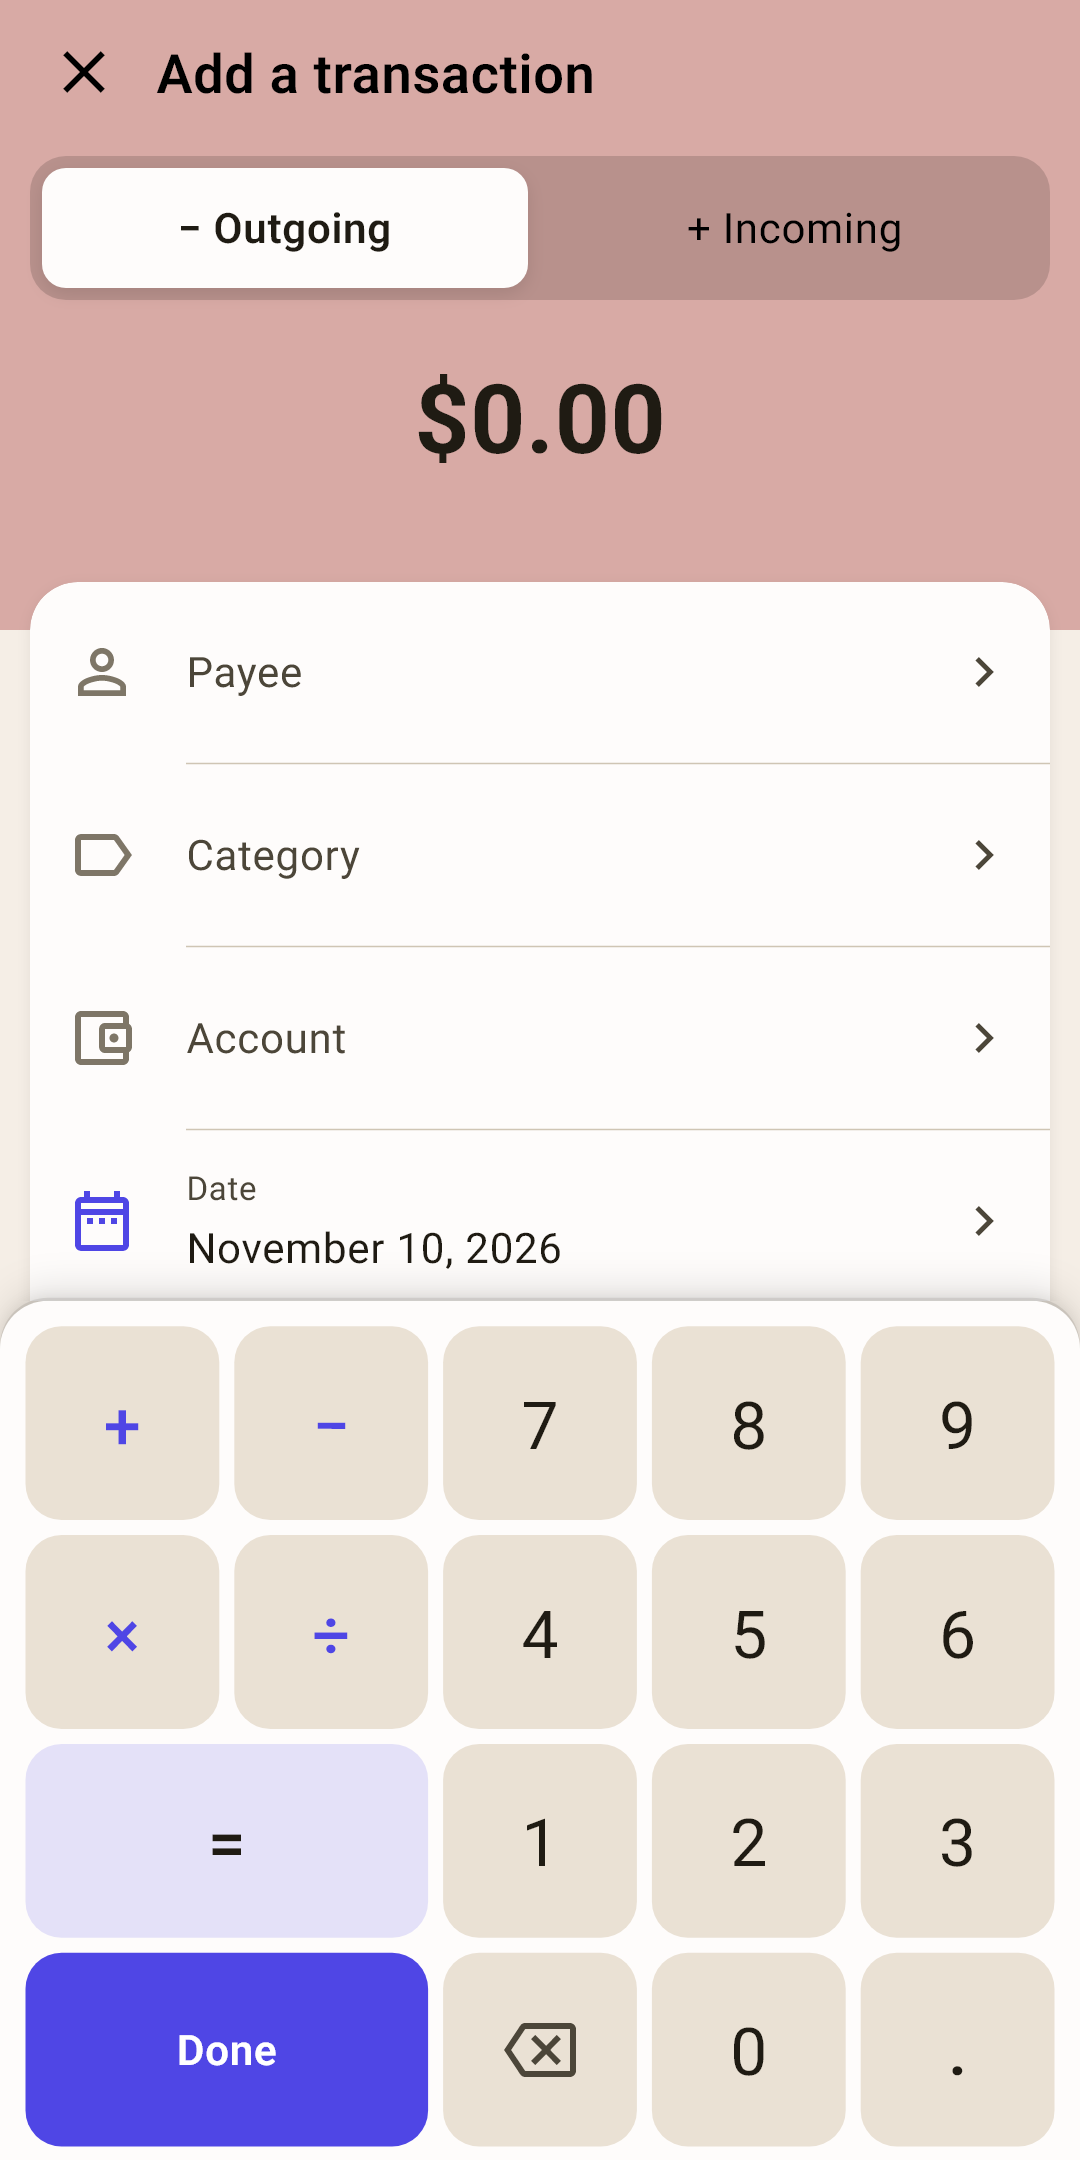
Close — the cross. If something is already typed, the app asks “Leave without saving?” — “Stay” or “Don't save”.
“Outgoing” / “Incoming” — an expense or income. The choice decides the amount's sign and the header color: reddish — an expense, green — income, gray — a transfer.
How it works
Choose “Incoming” and a payee — the app puts this month's income category in by itself: that way a paycheck goes straight into “unassigned” on the “Budget” screen.
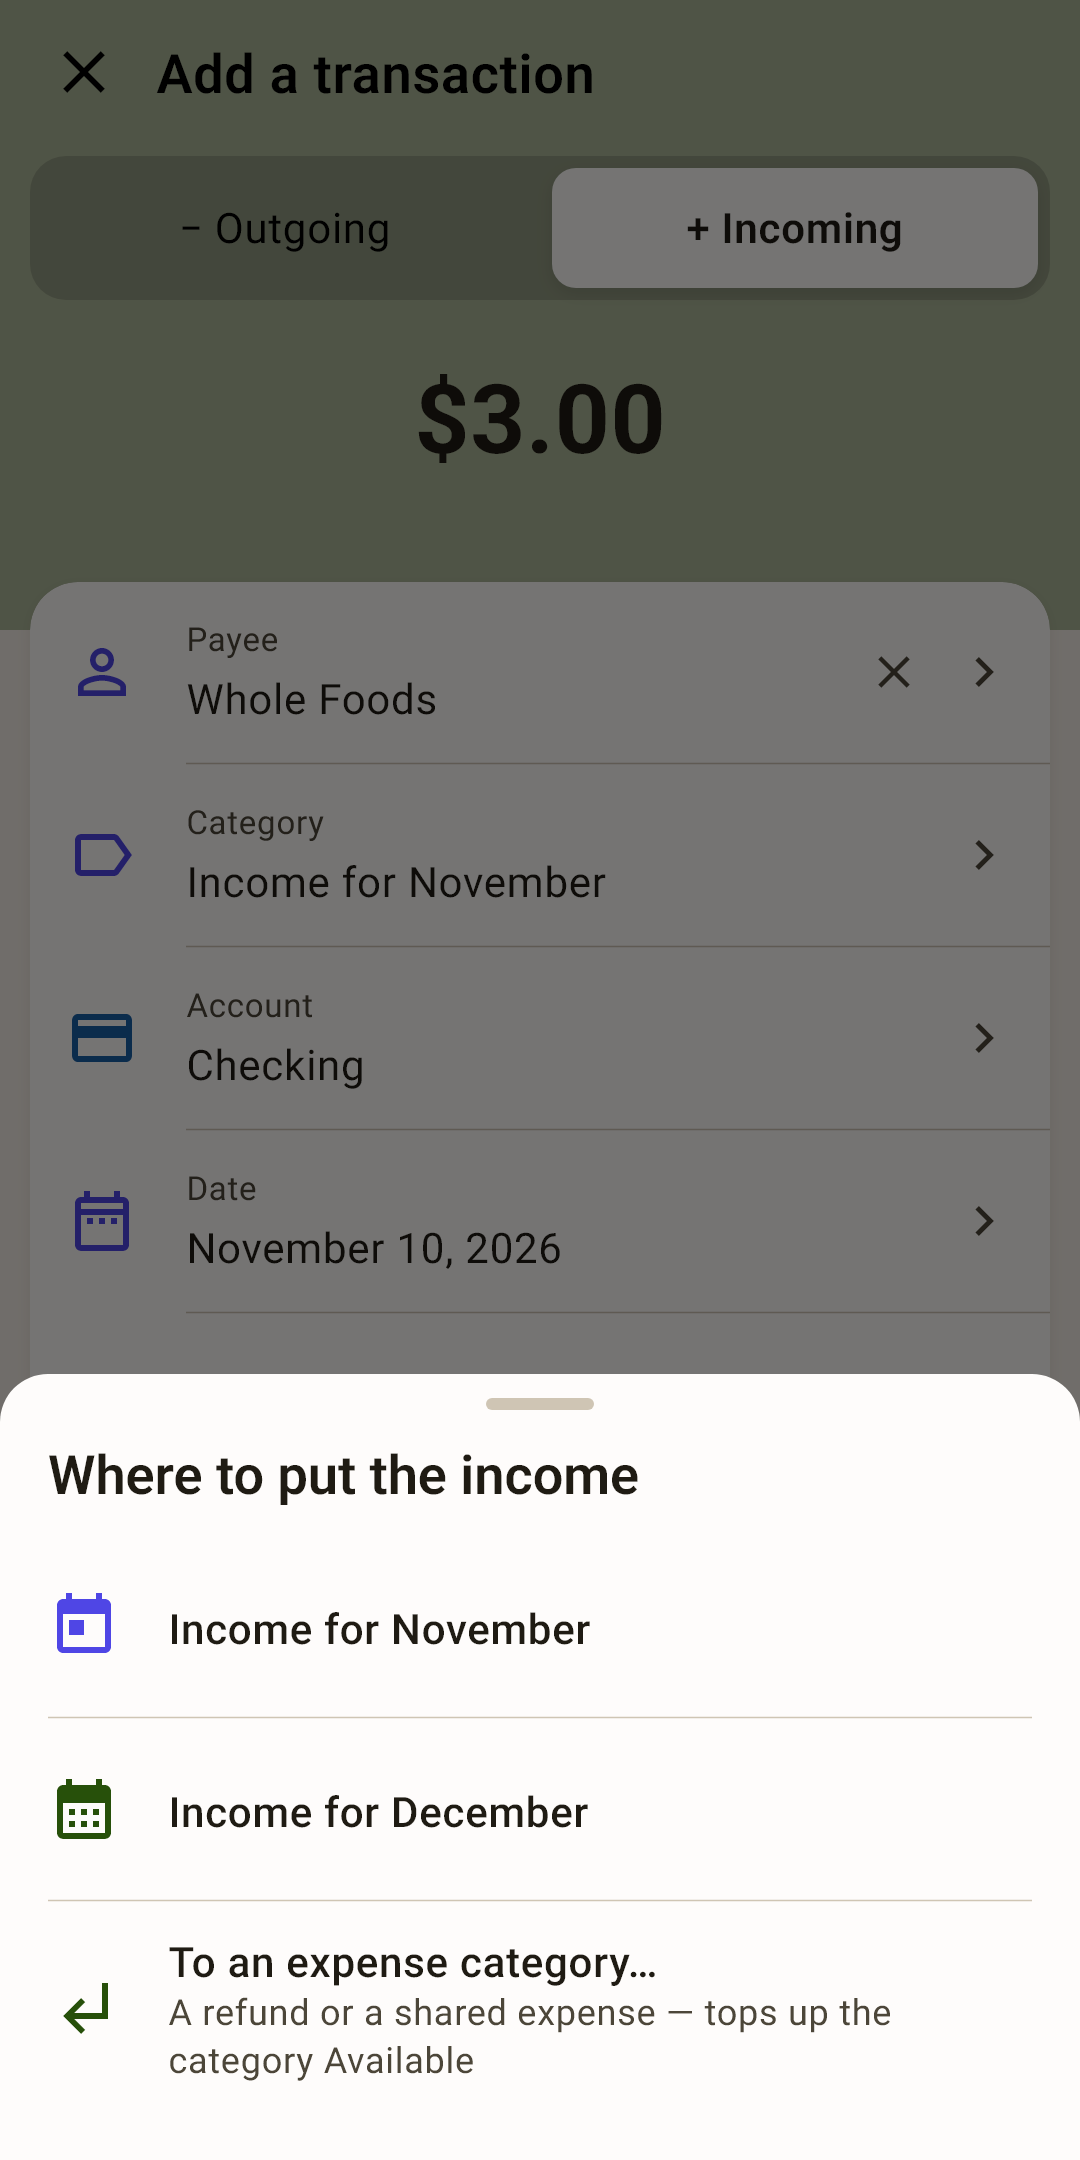
Tap the “Category” field for income — the “Where to put the income” sheet opens: “Income for November”, “Income for December” or “To an expense category…” (a refund, your share of a shared purchase). A paycheck is recorded for next month once your age of money reaches 30 days — why and what changes is covered in the article “Overview”, section “Age of money in detail”.
Amount — typed on the keypad below. If the keypad is hidden, tap the amount to bring it back.
Payee — who you paid or who the money came from: “Whole Foods”, “Employer”. Transfers between your own accounts are here too.
How it works
Choose a payee you've recorded before — the app fills in the category and note like last time. It fills only empty fields: if you've already chosen a category, it stays. A new payee is created from the search: type the name and choose “Create “…””. To remove the payee from a transaction, use the cross on the right of the field. More — below.
Category — the envelope the money left. Without it, a purchase won't reduce any row on the “Budget” screen.
Account — where the money left from or arrived to: checking, wallet, credit card. The icon and color are the same as in the account list.
Date — today, if you don't touch it. Tap it to open a calendar.
How it works
A date more than a month ahead — the app asks again: “The transaction will be recorded on …, more than a month ahead. Record it?”. That catches a typo in the year.
Amount keypad — the app's own, with a calculator. Explained below.
The amount keypad
The phone's regular keyboard is awkward for amounts: small digits, no operations, the decimal point somewhere on a second screen. The form has its own — big and with a calculator.
It does the math
A receipt for two, two purchases on one card — calculate right in the field.
How it works
Type 120, tap “+”, type 35 and tap “=” — the amount becomes 155. “+”, “−”, “×” and “÷” all work. The chosen operation stays highlighted while you type the second number.
Decimal point or cents
How to type the fractional part is up to you.
How it works
With a decimal point — like a calculator: 12, point, 50 is 12.50. While you're typing the cents, the decimal point key is highlighted.
From cents — like a card terminal: 1250 is 12.50. Instead of a decimal point the keypad has a “00” key: “3”, “00”, “00” is 300.00.
Switch it in “Settings → Language and formats → Amount entry”. Right after installing: with a decimal point.
Erase
Tap to erase the last digit. Press and hold to erase everything at once, together with an operation you've started.
“Done”
Hides the keypad, revealing the other fields and the “Save” button underneath. The system Back button does the same.
Which hand
The digits under your thumb.
How it works
“For the right hand” — digits on the right, operations and “Done” on the left (as in the screenshot). “For the left hand” — the other way round. “Settings → Language and formats → Amount keypad”. Right after installing: for the right hand.
Choosing the payee and category
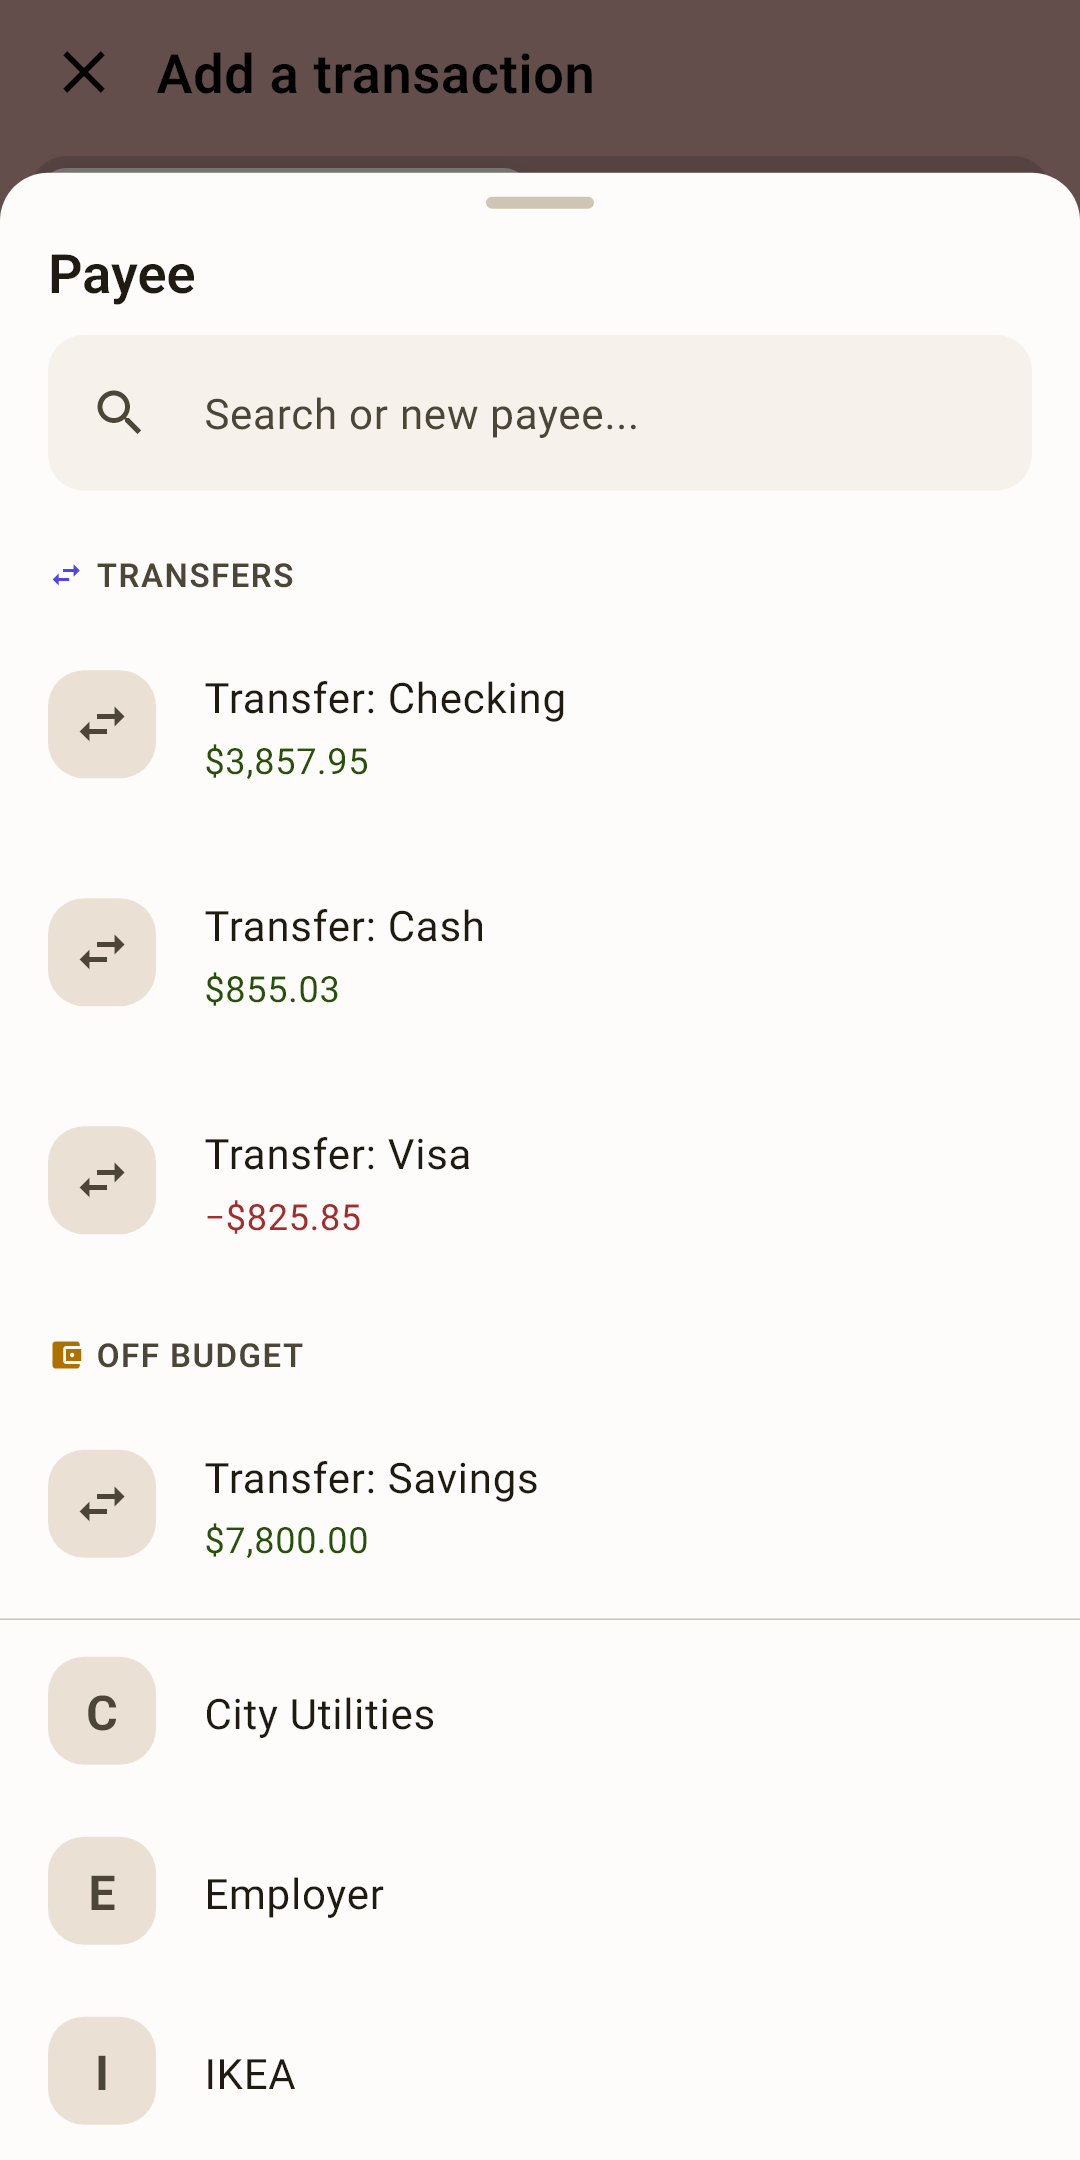
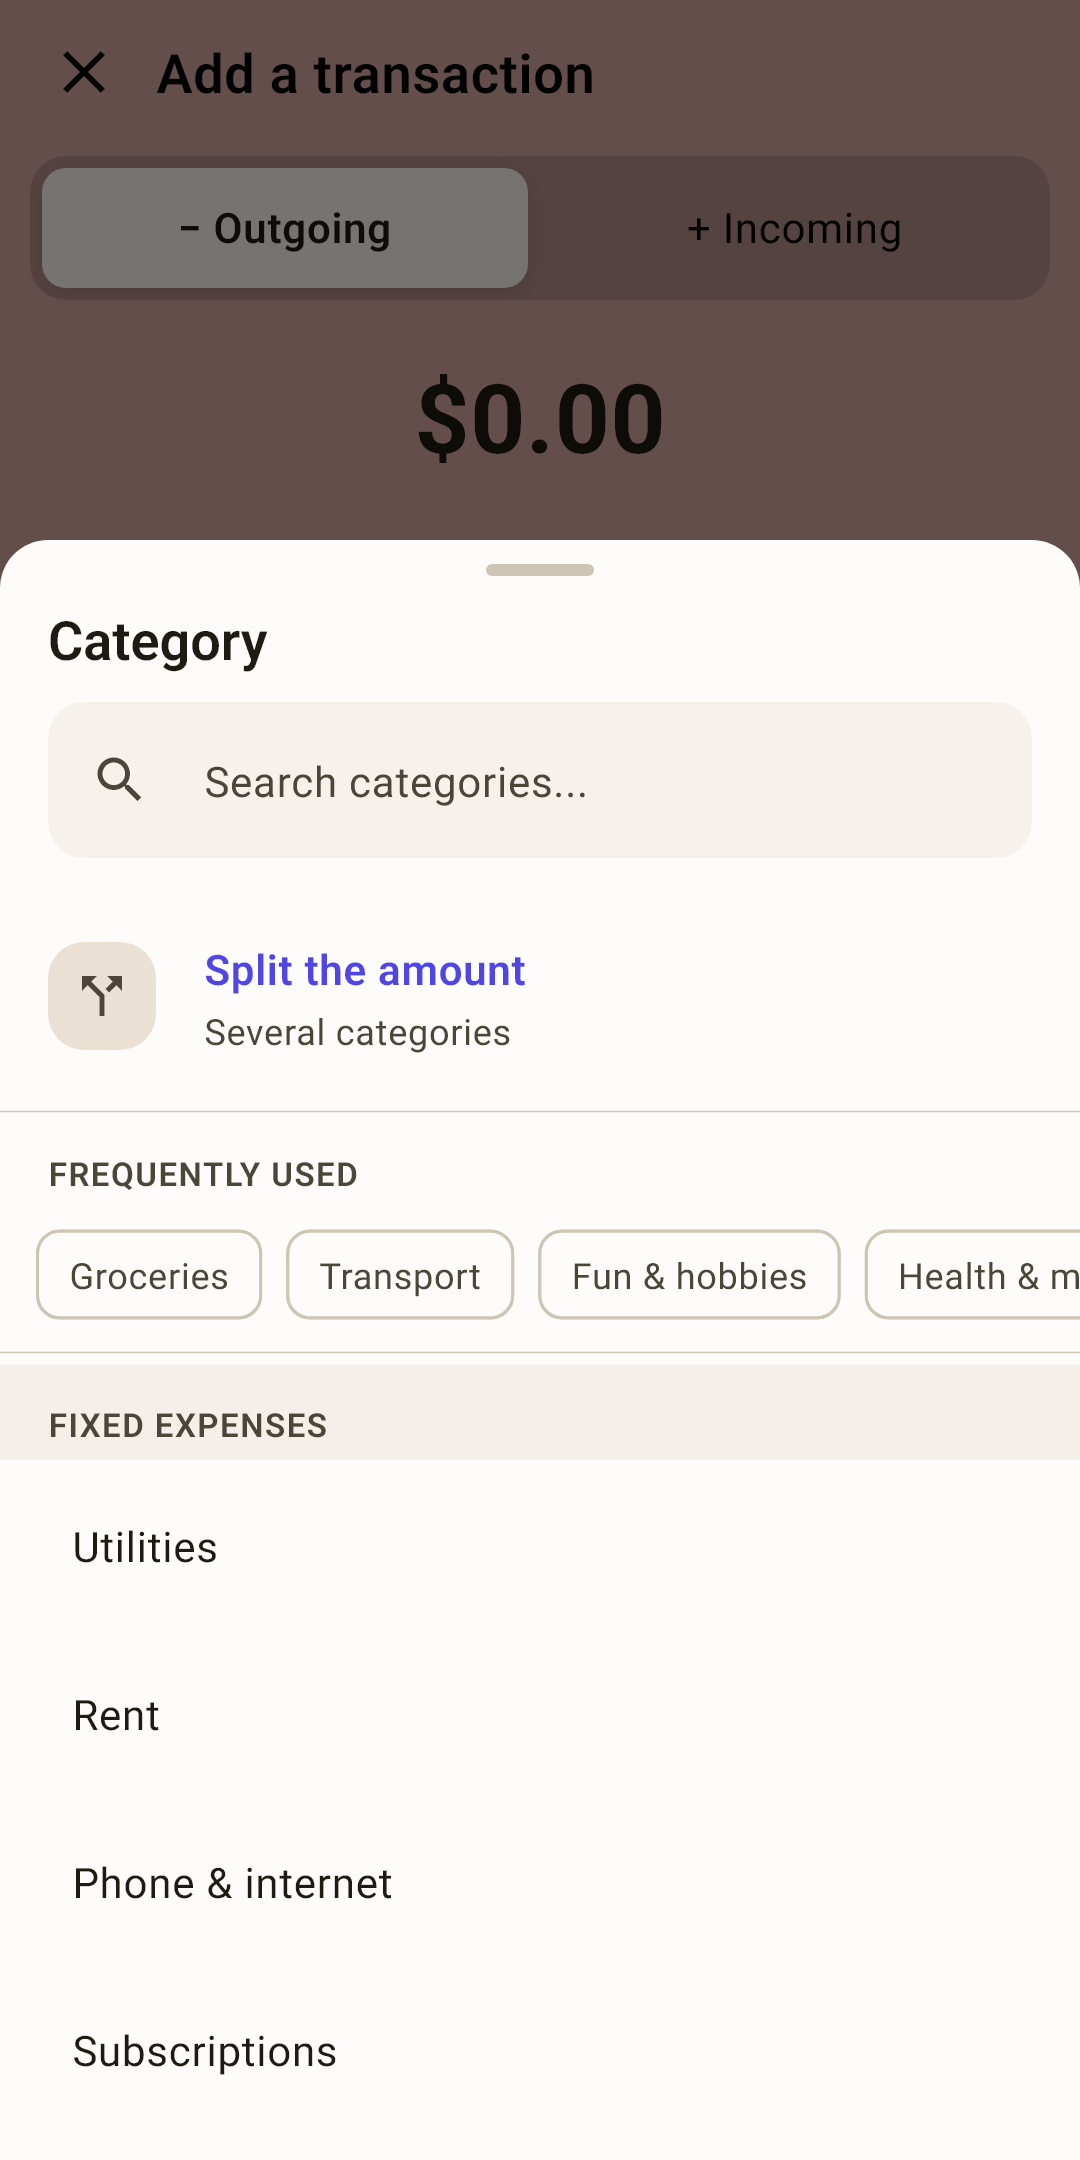
Both fields open a list from the bottom of the screen. At the top — search: type a couple of letters, and the list narrows.
 Open the screenshot full size ↗
 Open the screenshot full size ↗
Transfers — in the payee list
The money went to your own account? Choose it in the “Transfers” section: “Transfer: Visa”.
How it works
Under the account name is its balance, so you don't pick the wrong one. Off-budget accounts (savings, a deposit) are in their own section below. How a transfer works — below.
New payee
Not in the list? Type the name in the search and choose “Create “…””.
How it works
You don't need to set up payees in advance: the list builds up by itself as you record. To rename or delete — “Settings → Payees”.
“Frequently used”
Chips with the categories you choose most often. One tap and you're done.
How it works
Search also understands the group name. Can't find it? Choose “Create “…” in group”: the new category appears right away on the “Budget” screen too.
“Split the amount”
One purchase — several categories. Explained below.
A filled-in transaction
The purchase at “Whole Foods” from the “Activity” article: with a tag, an e-receipt and a photo. The keypad is hidden and “Additional” is expanded — all of the form's fields are visible.
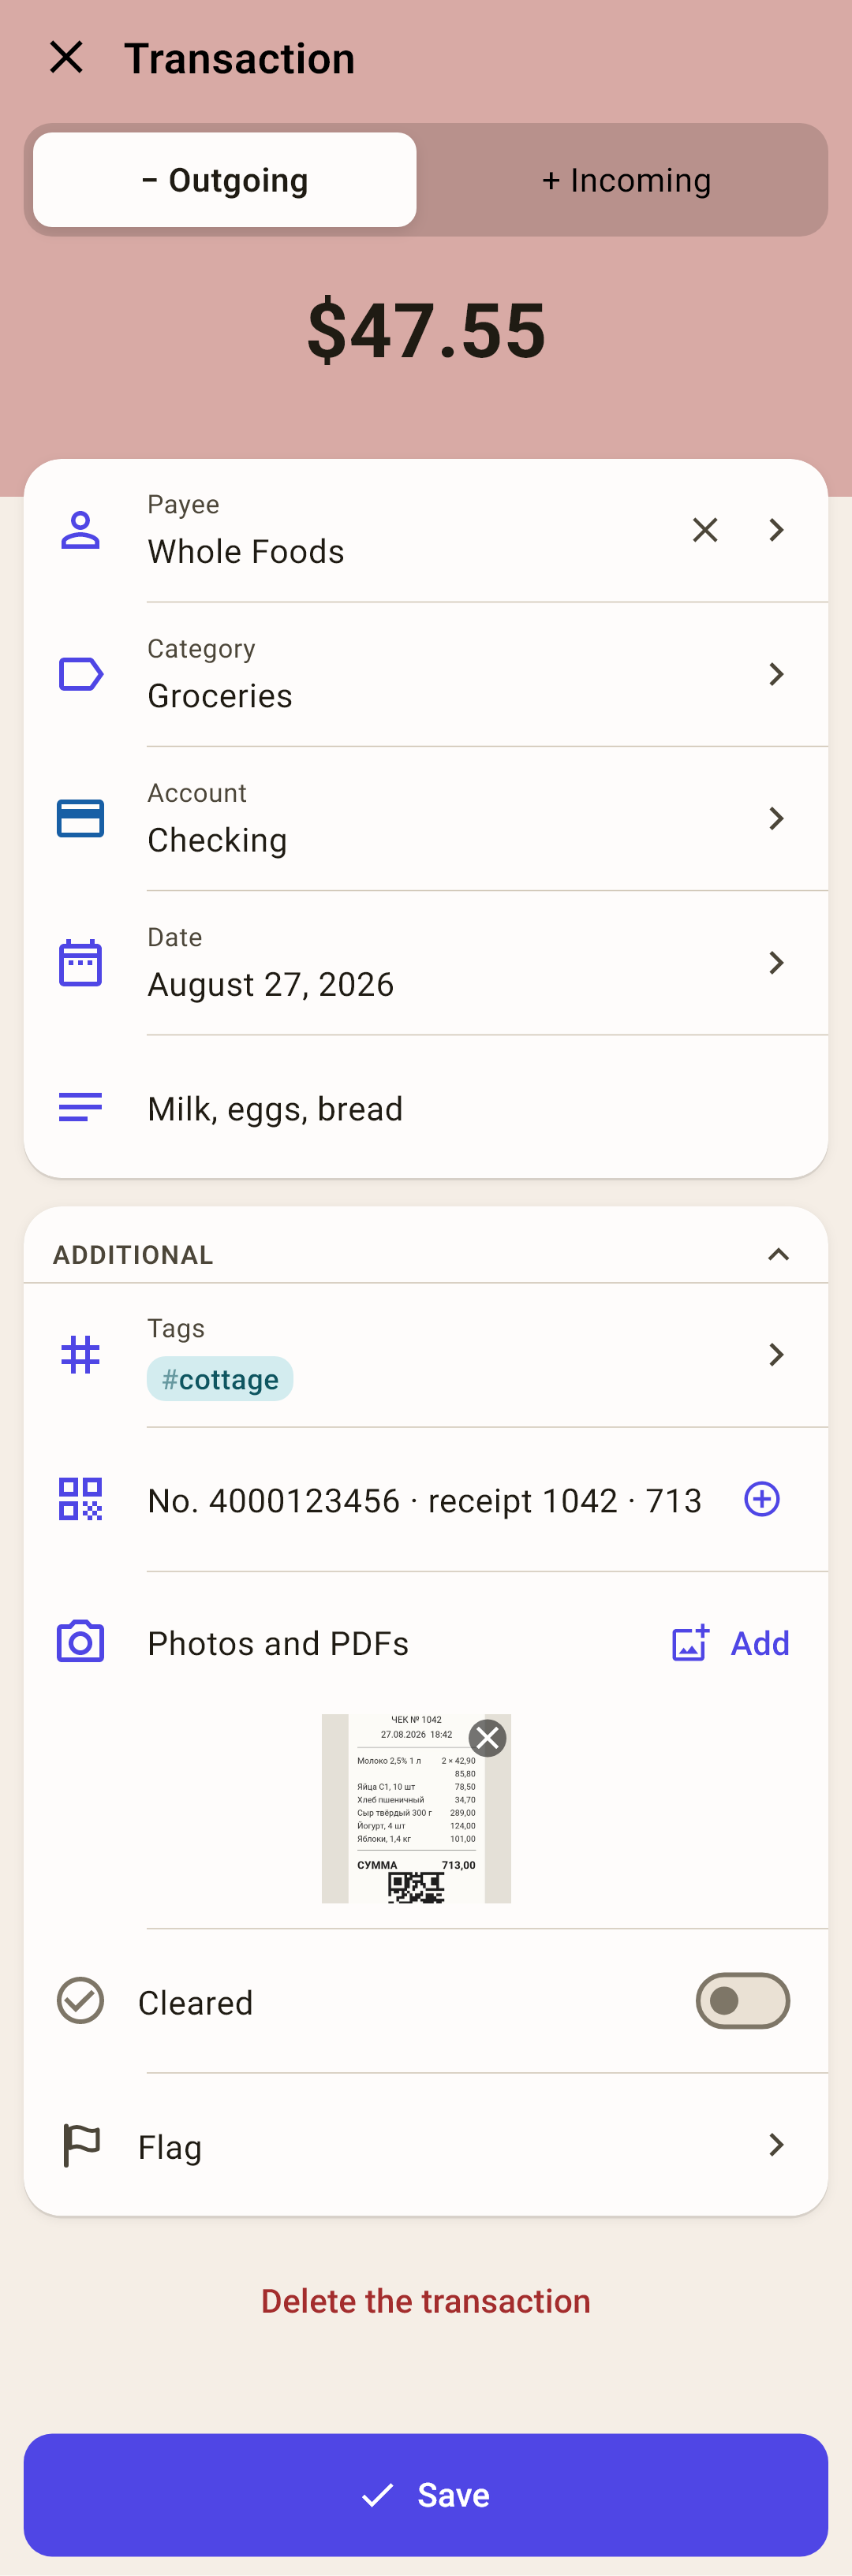
Note — what you bought or why: “Milk, eggs, bread”. It shows in the feed in italics and can be found with search.
How it works
The amount is optional: an entry without an amount is a note about an event. For example: oil changed at 85,000 km, gave Andrew the keys to the cottage. It still needs an account and a category. On the first tap of “Save” the app answers “Enter an amount”, on the second “Enter an amount. Tap again and it will be saved without one”, and the third tap saves the entry.
Later, search in “Activity” finds it: search looks at note text too — type oil, for example.
“Additional” — the rarely used fields in one card. Tap the header to collapse or expand the card.
How it works
A collapsed card is one line, with icons on the right for the fields hidden in it: tag, receipt, photo, “Cleared”, flag. A filled-in field is always visible, even in a collapsed card. The app remembers your choice. Right after installing: collapsed.
Tags — labels on top of the category: “#cottage”, “#vacation”. The picker sheet — below.
E-receipt — the code or link from the receipt. The scanner icon on the right points the camera at a QR code, “+” adds another receipt.
How it works
If the app knows your country's receipts, it checks the receipt against the form: it fills in the amount if there isn't one yet, and if the amounts differ, it shows a line under the field and offers “Fix”. A receipt never changes the date. More about receipts and photos — in the article “Activity”.
Photos and PDFs — “Add” — take a picture of a receipt, pick a photo from the gallery or a PDF. The cross on a thumbnail removes it.
How it works
Don't overdo it: every photo goes into all backups and, if it's on, into the cloud. More — in the article “Activity”.
“Cleared” — check it when the transaction shows up on your bank statement. The circle in the feed row does the same.
How it works
The mark is optional: it doesn't affect the budget, it only helps reconcile the account with the bank. If you've never used it, just skip it — empty circles are fine.
Flag — a colored “come back later” mark: to check, to wait for a refund, to discuss. A little flag appears in the feed row.
Delete the transaction — only for a transaction that's already recorded. The app asks again.
“Save” — record it. Without an account or a category the app won't save and tells you what to choose. A zero amount is allowed: such an entry becomes a reminder note in the feed.
A transfer between your own accounts
Withdrew cash, paid off a credit card, moved money to a deposit — that's not spending, it's money moving. Record such transactions as transfers, otherwise the budget will count them as expenses.
 Open the screenshot full size ↗
 Open the screenshot full size ↗
Where to — in the “Payee” field
Choose an account in the “Transfers” section. The form's header turns gray.
How it works
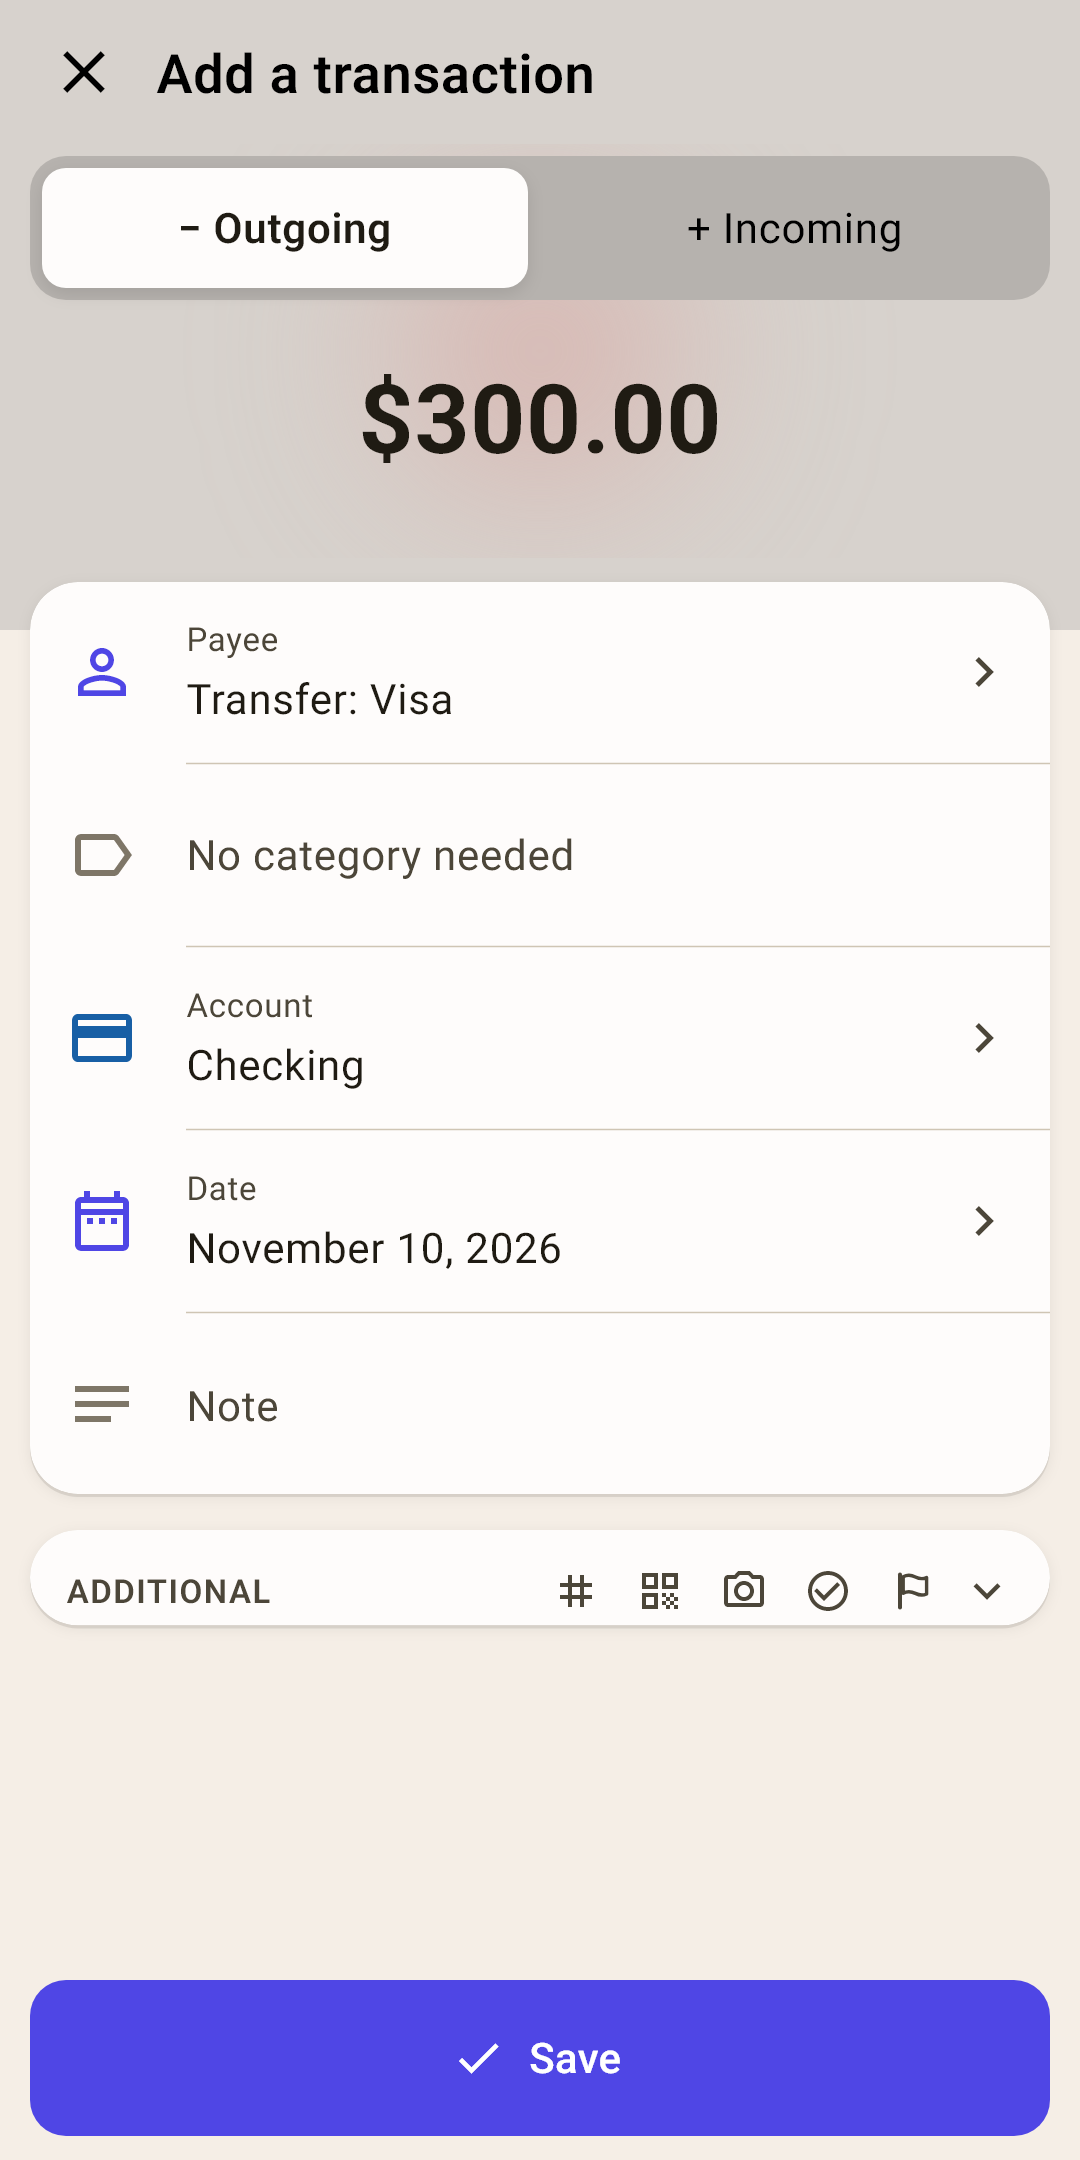
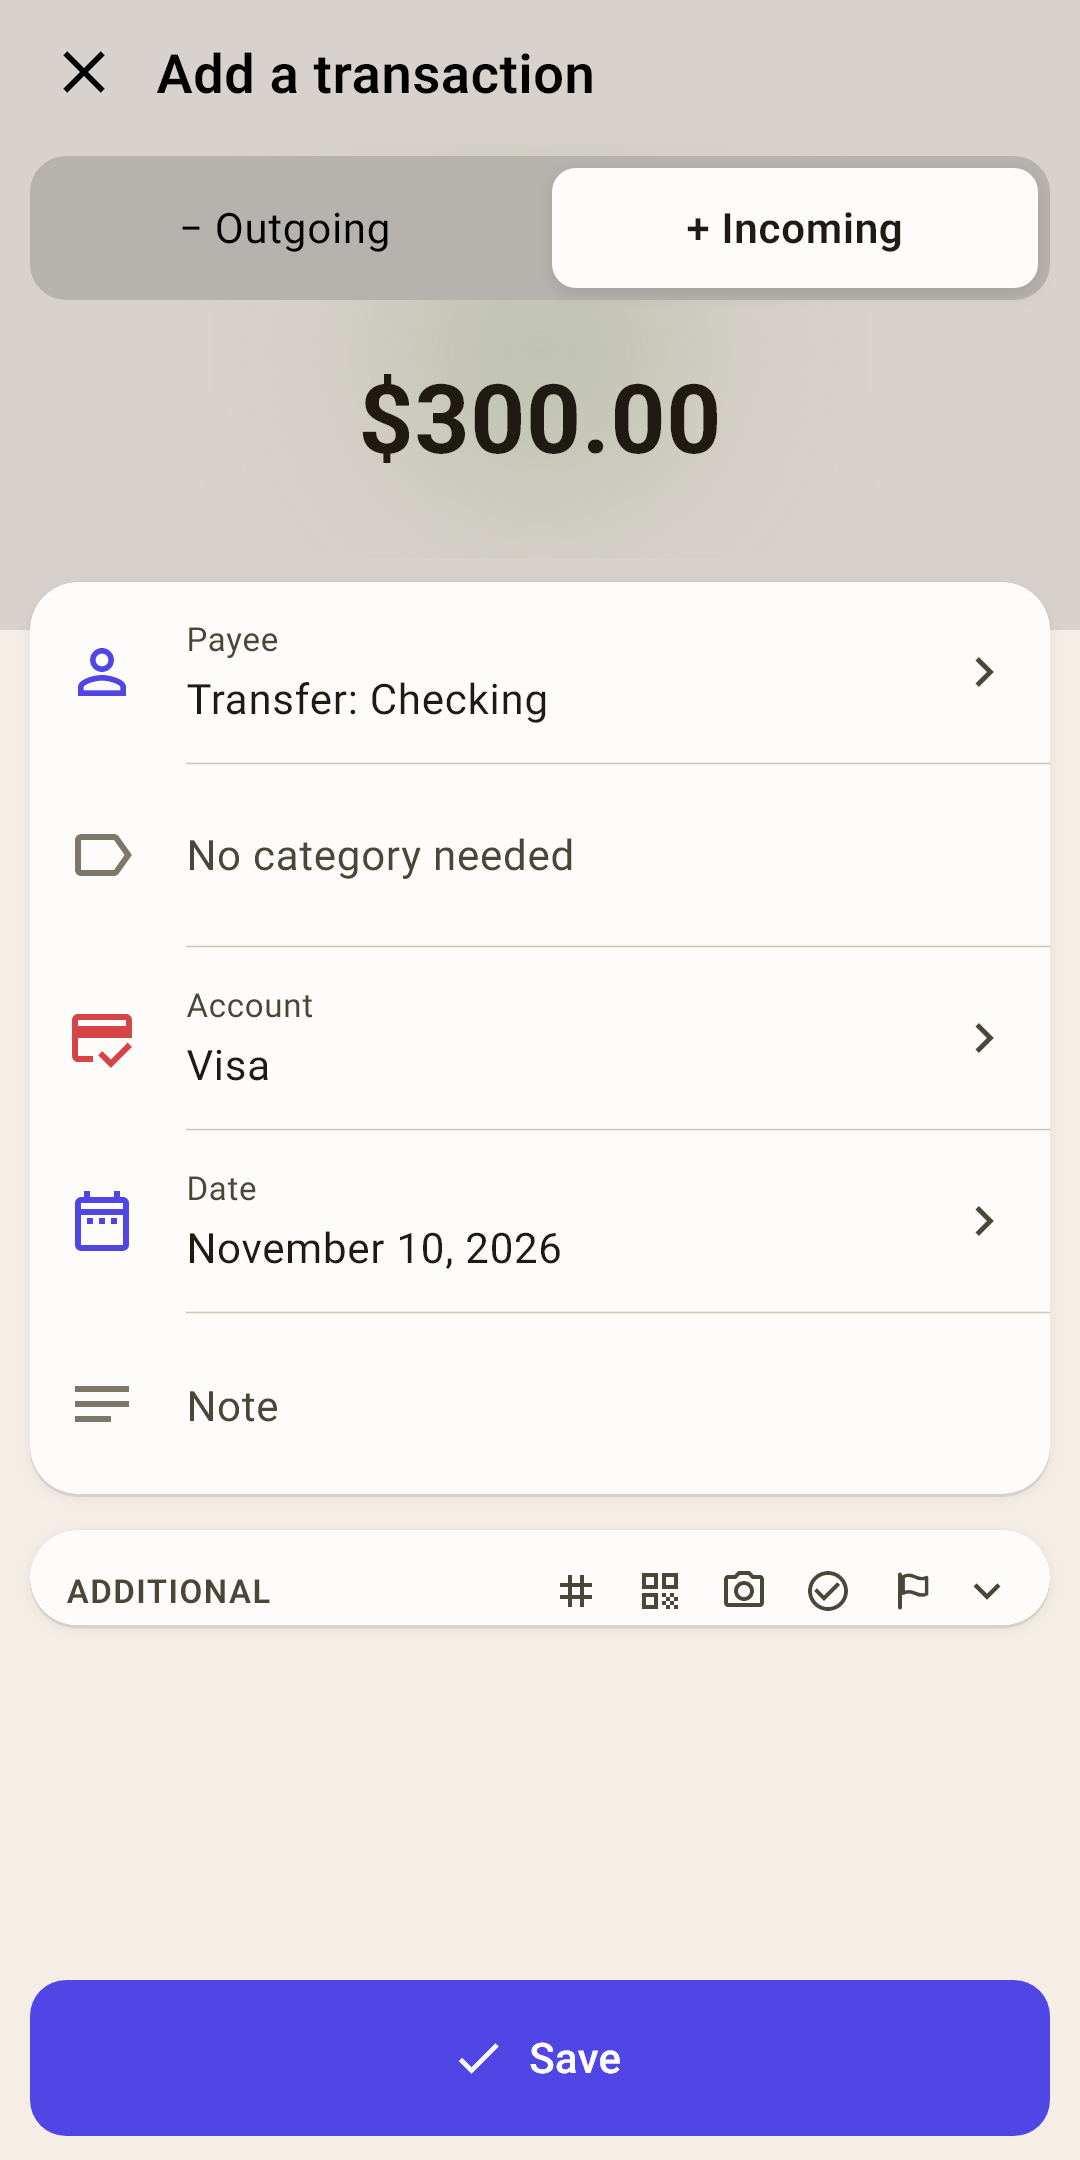
The screenshot shows a credit card payment: $300 from “Checking” to “Visa”. Two rows appear in the feed: a minus on checking and a plus on the credit card.
“No category needed”
The money is still yours — it just moved. The envelopes on the “Budget” screen don't change.
How it works
The exception is a transfer between a budget account and an off-budget one (to savings, for example). Then money leaves the envelopes or enters them, and the app asks for a category.
“Outgoing” and “Incoming” for a transfer
The direction is from the point of view of the account in the “Account” field.
How it works
“Outgoing” — money leaves this account for the account in the “Payee” field. A red circle glows softly behind the amount. “Incoming” — money arrives on this account from the one in “Payee”. The circle is green. A transfer's header is gray either way.
One transfer — two ways to record it
A $300 payment from “Checking” to “Visa” can be recorded from either side. The result is the same.
How it works
Leaving checking (left screenshot): “Account” — Checking, “Payee” — “Transfer: Visa”, “Outgoing”, red glow.
Arriving on the credit card (right screenshot): “Account” — Visa, “Payee” — “Transfer: Checking”, “Incoming”, green glow.
Either way the same two rows appear in the feed: −300 on Checking and +300 on Visa, both with the transfer icon. Choose whichever is handier: reconciling the checking statement — record it as leaving checking; your bank's app says “credit card payment received” — record it as arriving on the card. From an account screen, the form opens with that account by itself.
Record a transfer once. The app adds the other side by itself. Record it leaving checking and then also arriving on the credit card, and the transfer doubles: $600 leaves checking, and $600 arrives on the card instead of $300.
Different currencies
From a dollar card to a euro account — the form offers conversion by itself.
How it works
Under the payee, fields appear: “Credited” — how much arrives on the second account — and “Rate”, with a button that flips the rate's direction. Change the amount, and “Credited” is recalculated; change the rate — the same; enter “Credited” — and the rate is recalculated.
A split amount
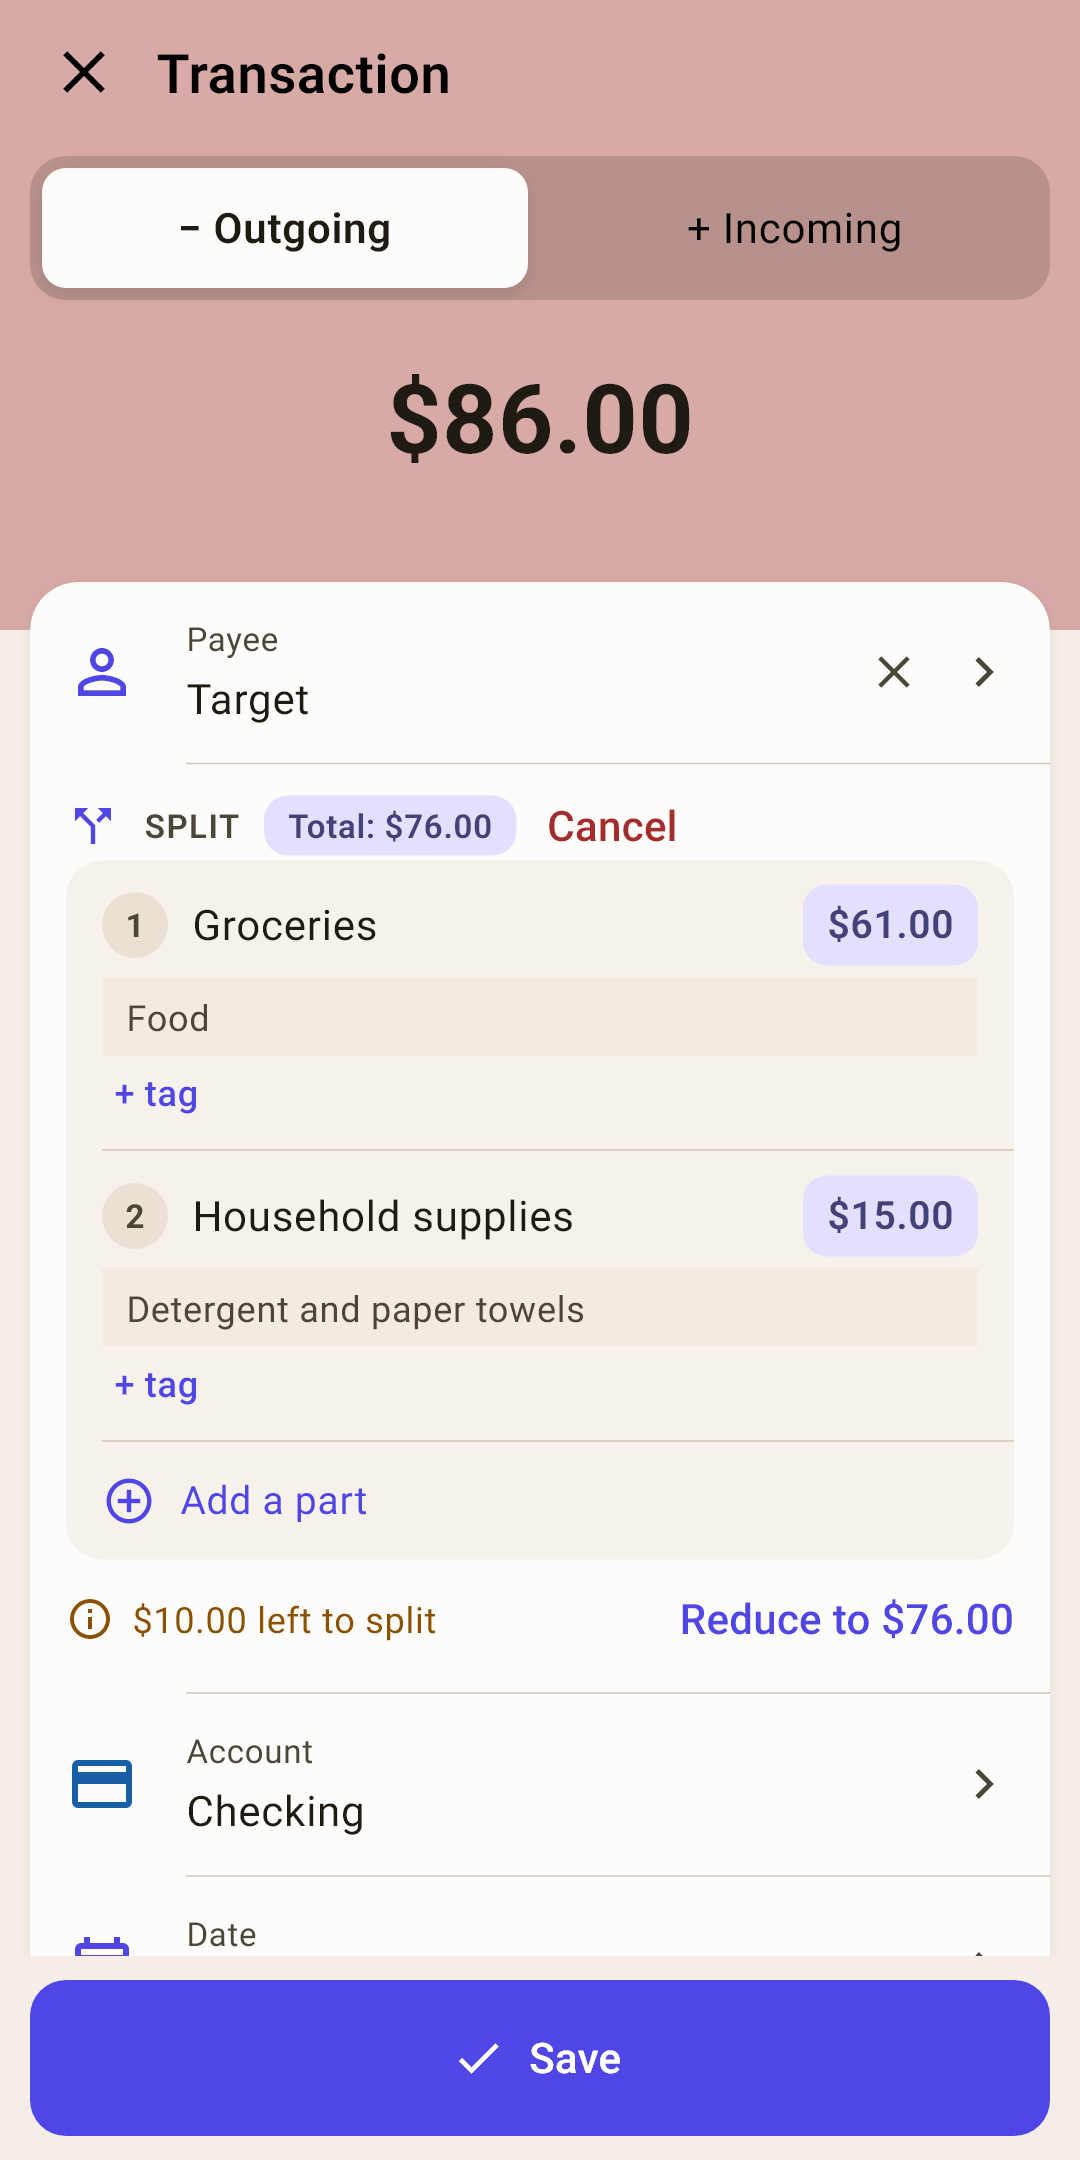
One purchase — several envelopes: at “Target” you bought food for $61 and cleaning supplies for $25. Record it as one transaction, but in two categories — then both envelopes shrink honestly.
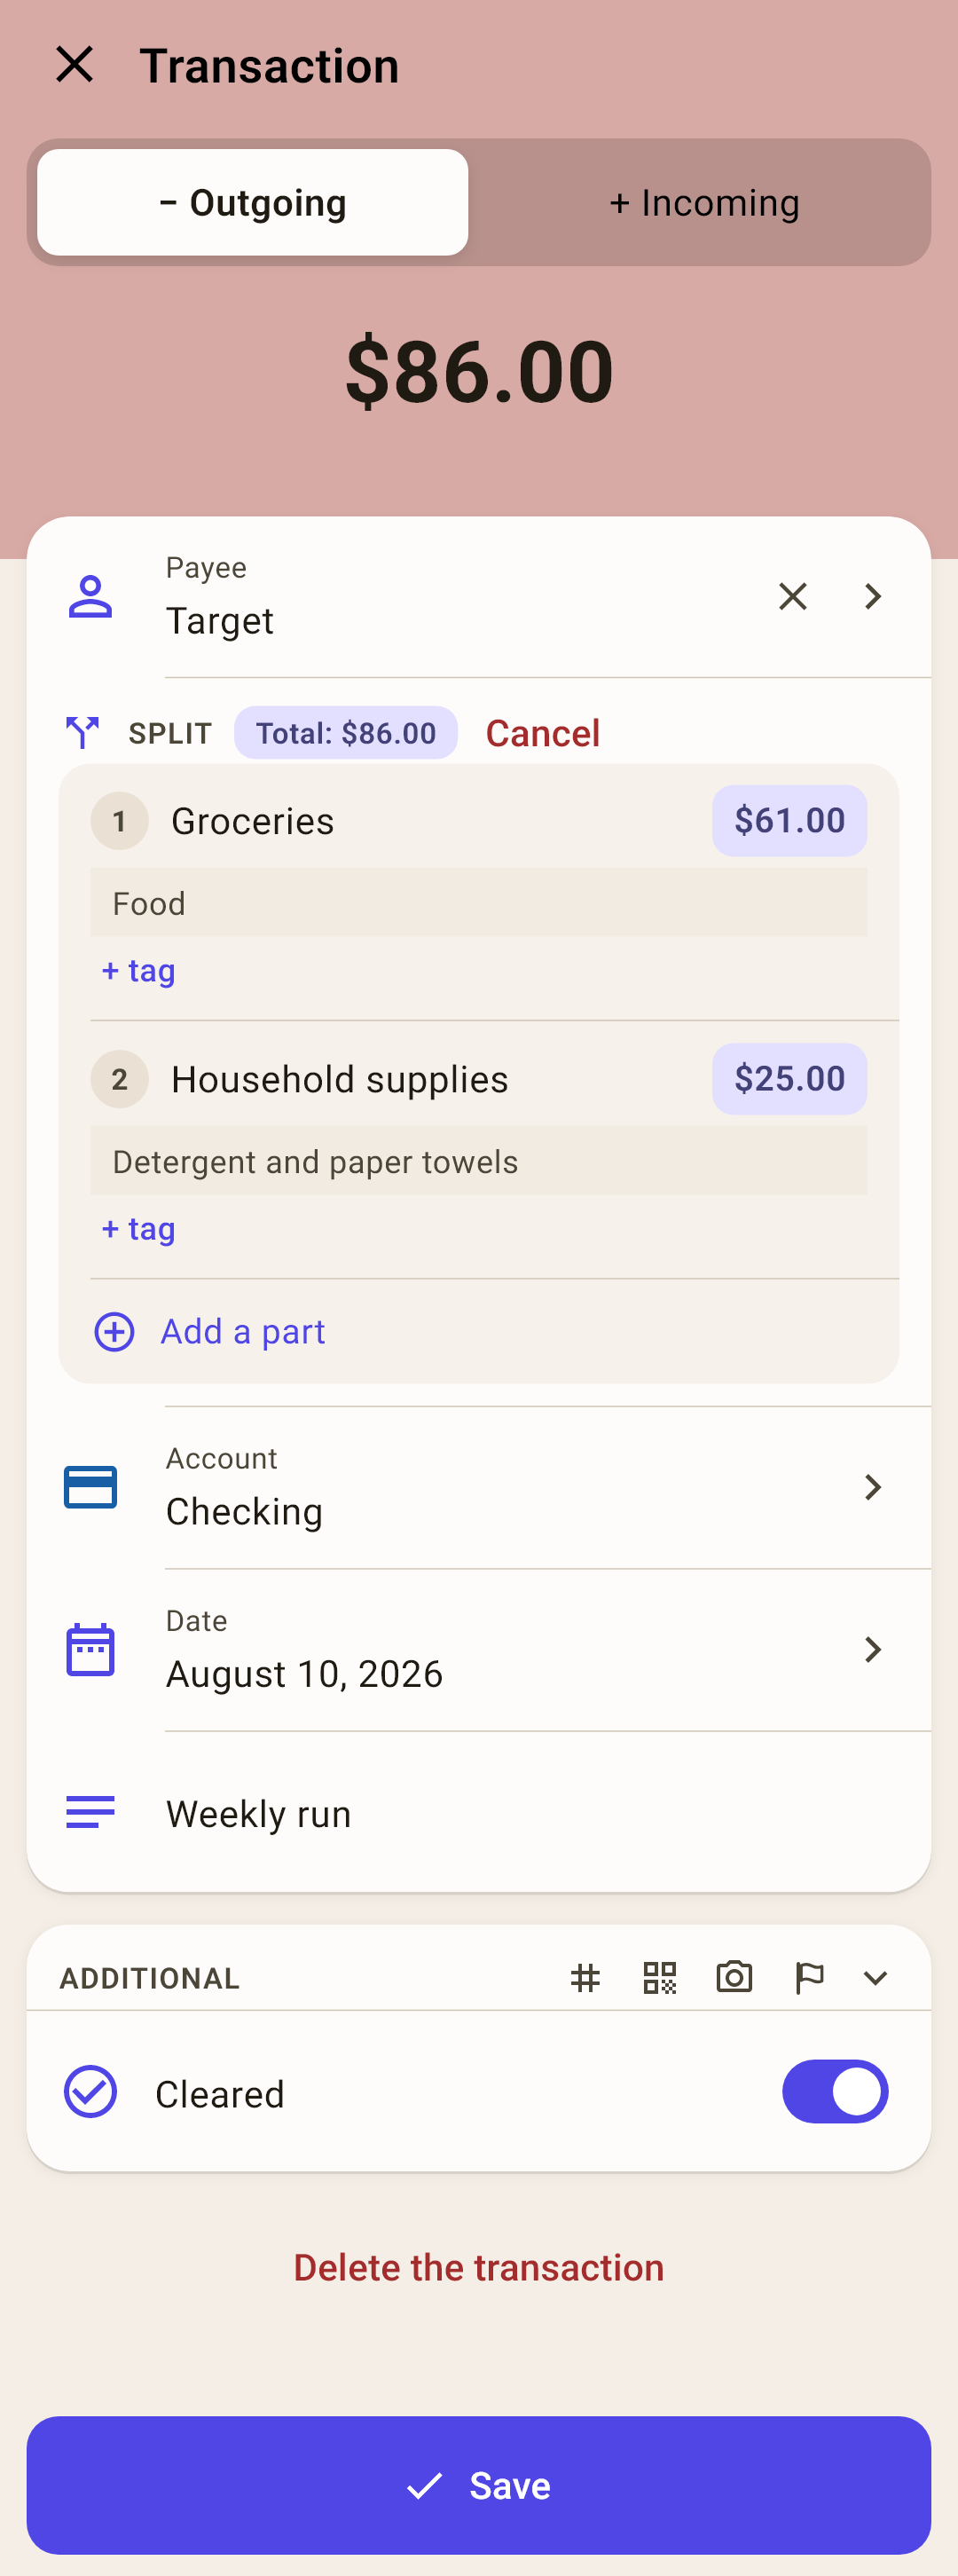
“Split”
Appears instead of the “Category” field when you choose “Split the amount”. Next to it — the “Total” of the parts.
A part
Its own category, amount and note. Tap the category or amount — only this part changes.
How it works
A part can be a transfer too: asked for cash back at the checkout — $70 to “Groceries” and $30 as “Transfer: Cash”. An example with numbers — in the article “Activity”.
“+ tag”
A tag just for this part. A tag from the form's “Tags” field applies to the whole purchase at once.
“Add a part”
One more line. The cross to the right of an extra part removes it.
“Cancel”
Go back to one category for the whole amount.
The parts don't add up to the total? Explained below.
The parts don't add up to the amount
Made a mistake in one part? The app won't fix it silently — it shows the difference right under the parts and offers a way to close it.
 Open the screenshot full size ↗
 Open the screenshot full size ↗
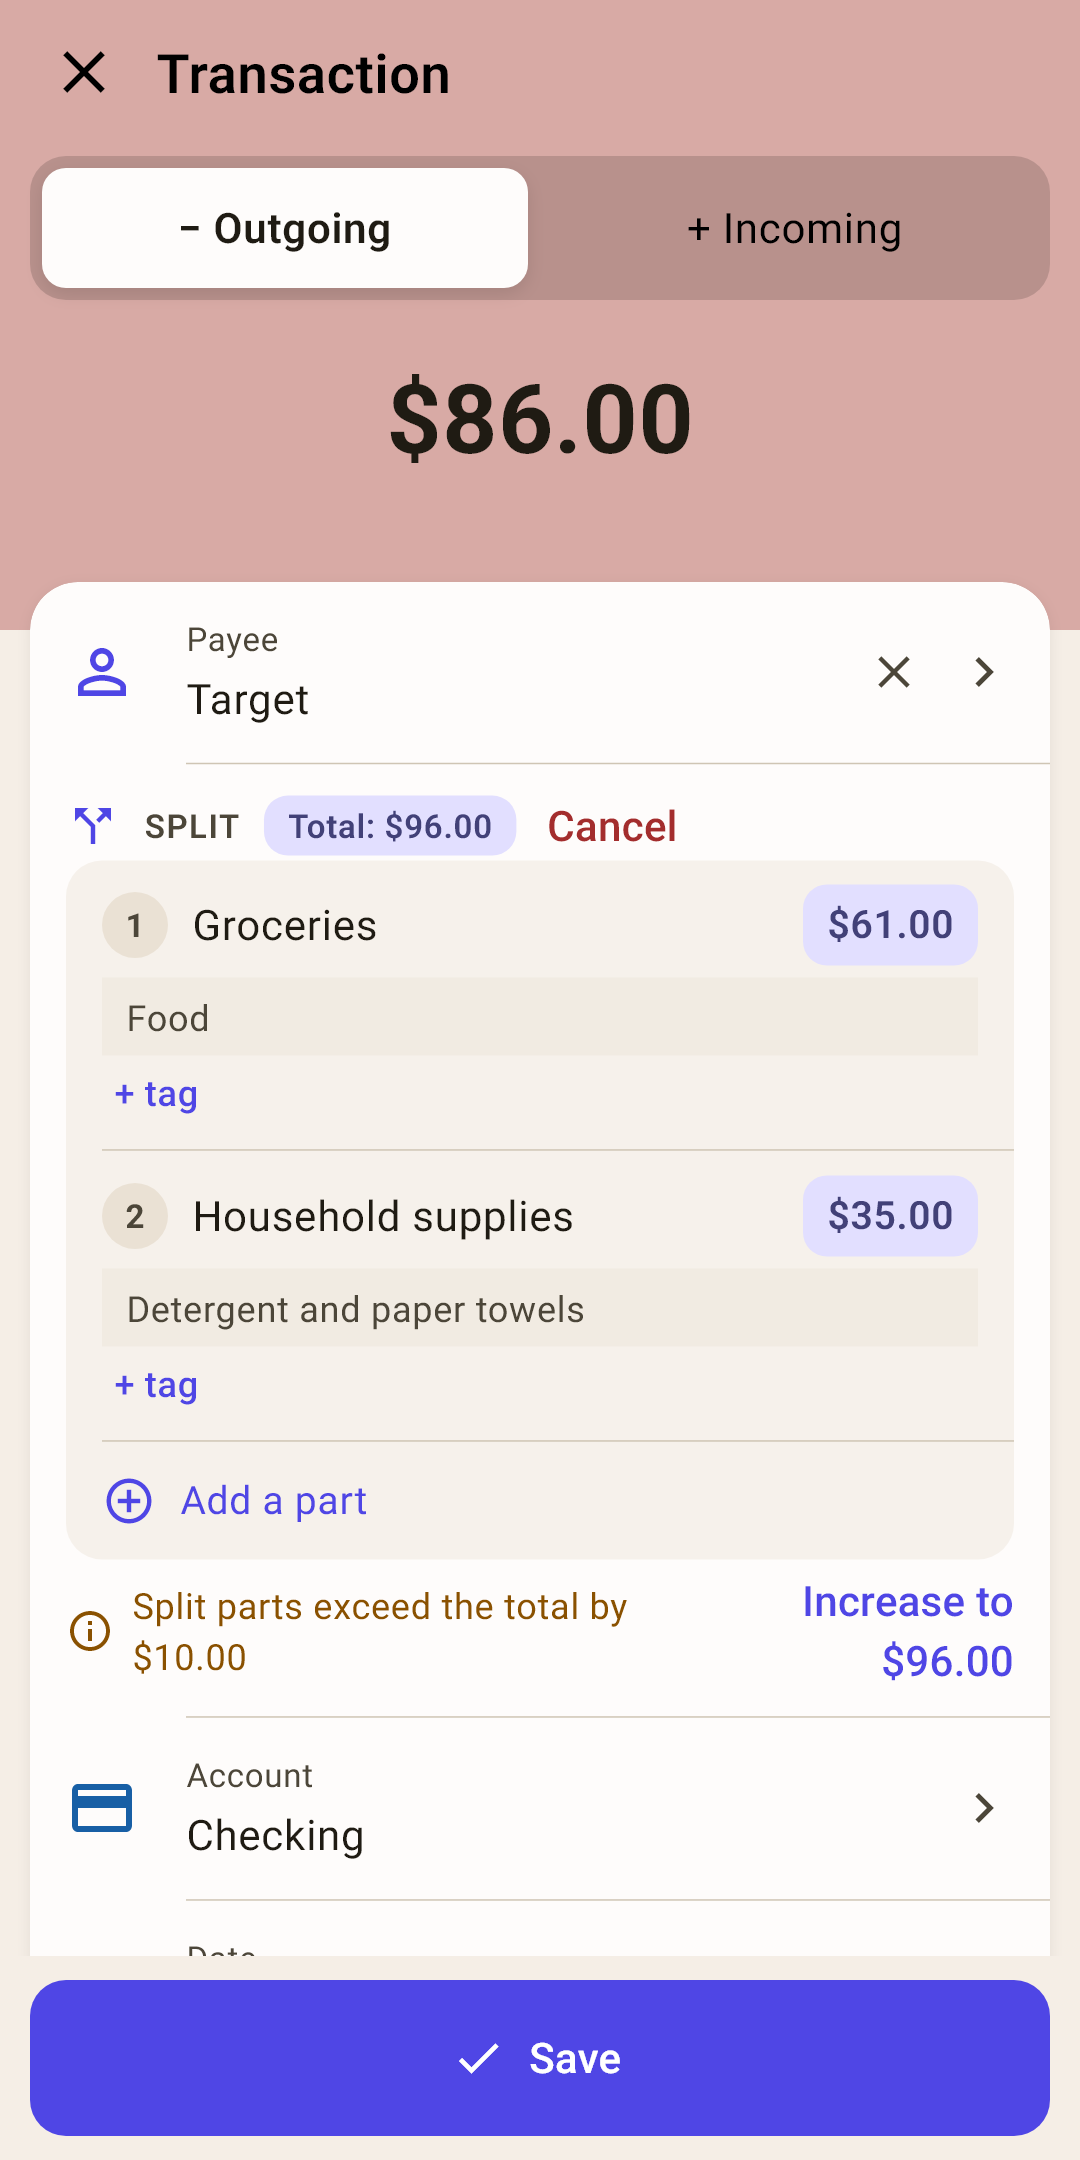
“Split parts exceed the total by …” / “… left to split”
How far the parts are from the total. The line appears under the parts by itself while you edit.
How it works
While you're editing, the line is yellow — it's a hint. Tap “Save” with amounts that don't add up, and the line turns red, and the form won't save the transaction until the amounts match. The same fix button is also in the message at the bottom of the screen.
“Increase to …” / “Reduce to …”
One tap — and the total becomes equal to the sum of the parts.
How it works
On the left: in the second part you typed 35 instead of 25. Together the parts make $96, while the total is $86: “Split parts exceed the total by $10.00”, and the “Increase to $96.00” button adds those 10 to the total. On the right it's the other way round: 15 instead of 25 — “$10.00 left to split”, and the “Reduce to $76.00” button takes 10 away.
The button fixes the total, not the part. If the total is right — as on the receipt — and you made the mistake in a part, fix the part itself: tap its amount and type the right one.
Refund for a returned item
Returned spoiled milk, took back a jacket that didn't fit — the money came back. That's not income: record it as a refund to the same category you paid from.
 Open the screenshot full size ↗
 Open the screenshot full size ↗
How to record it
A refund is money that came from the store back to the category it left from.
How it works
“+ Transaction” → “Incoming”.
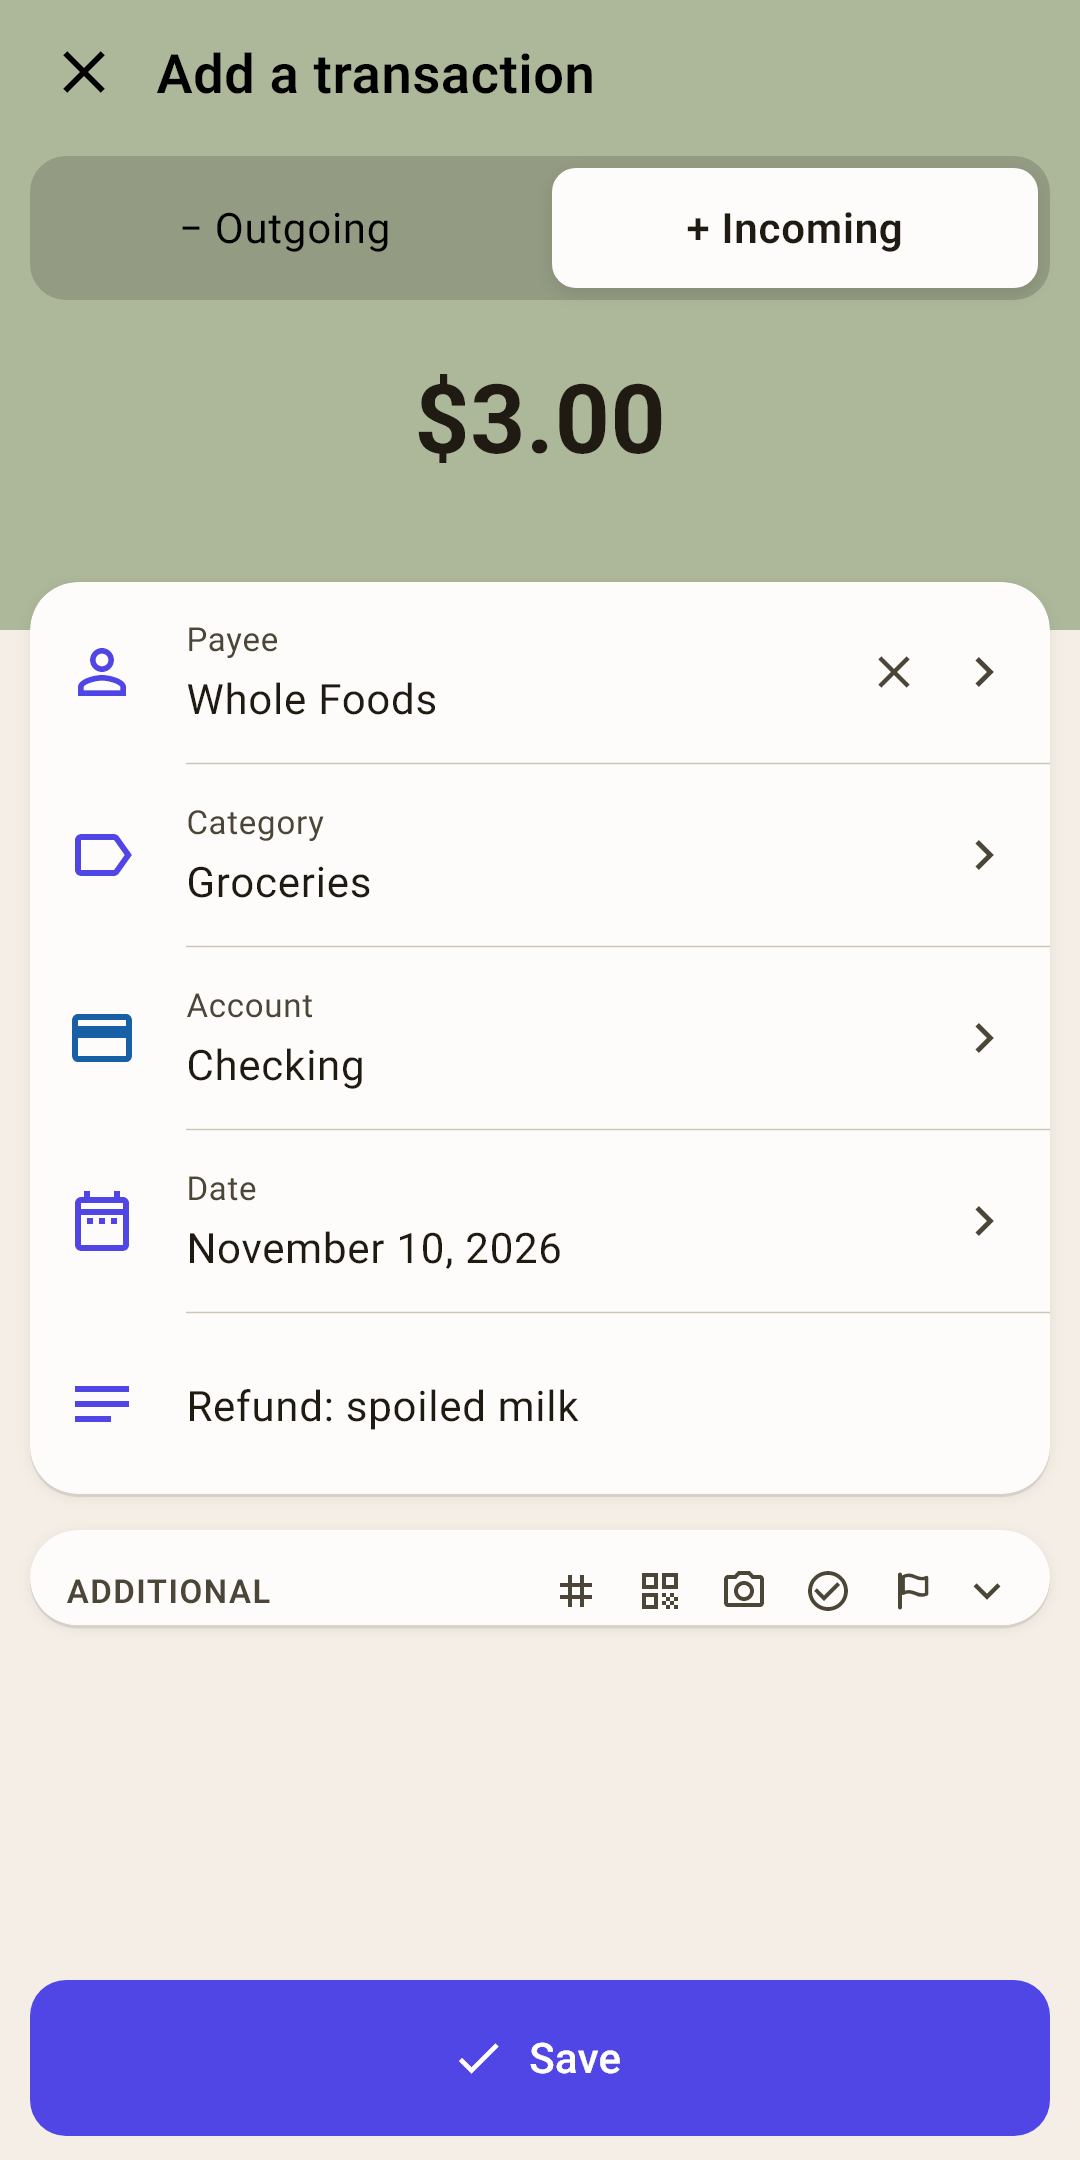
The refund amount. Payee — the same store. Account — where the money was returned, usually the same card.
Out of habit, the app puts “Income for November” in “Category” (left screenshot). Tap the “Category” field → “To an expense category…” → choose the category you bought from: “Groceries”.
Note — optional: “Refund: spoiled milk”. Save.
What changes
The “Groceries” envelope is topped up, “unassigned” isn't.
How it works
On the “Budget” screen, “Groceries” shows “spent” $3 lower, and the balance grows by the same amount.
“Unassigned” doesn't change: you didn't earn it, you got your own money back.
On the category and store screens, spending is counted after refunds.
In the “Overview” calendar, a day with only refunds is marked with an empty ring.
Refunded to a credit card? The card's debt goes down, and with it the amount set aside for paying it in “Card payments”.
What if you record it as income
The budget will lie twice.
How it works
“Income for November” adds $3 to “unassigned” as if you'd earned it, while “Groceries” keeps a purchase that didn't really happen. The “Income and expenses” report shows both income and expenses higher than they really are.
Why not delete the purchase
You can delete it if you returned everything the same day.
How it works
If the purchase has already cleared the bank or been reconciled, or you returned only part of it, record the refund as a separate transaction. The bank statement will have two lines, the purchase and the refund — let the app have two as well: the reconciliation will match.
Money a friend paid you back for their half of a shared purchase is recorded the same way: “Incoming”, from the friend, to the purchase's category.
Tags
The “Tags” field in “Additional” opens a picker sheet.
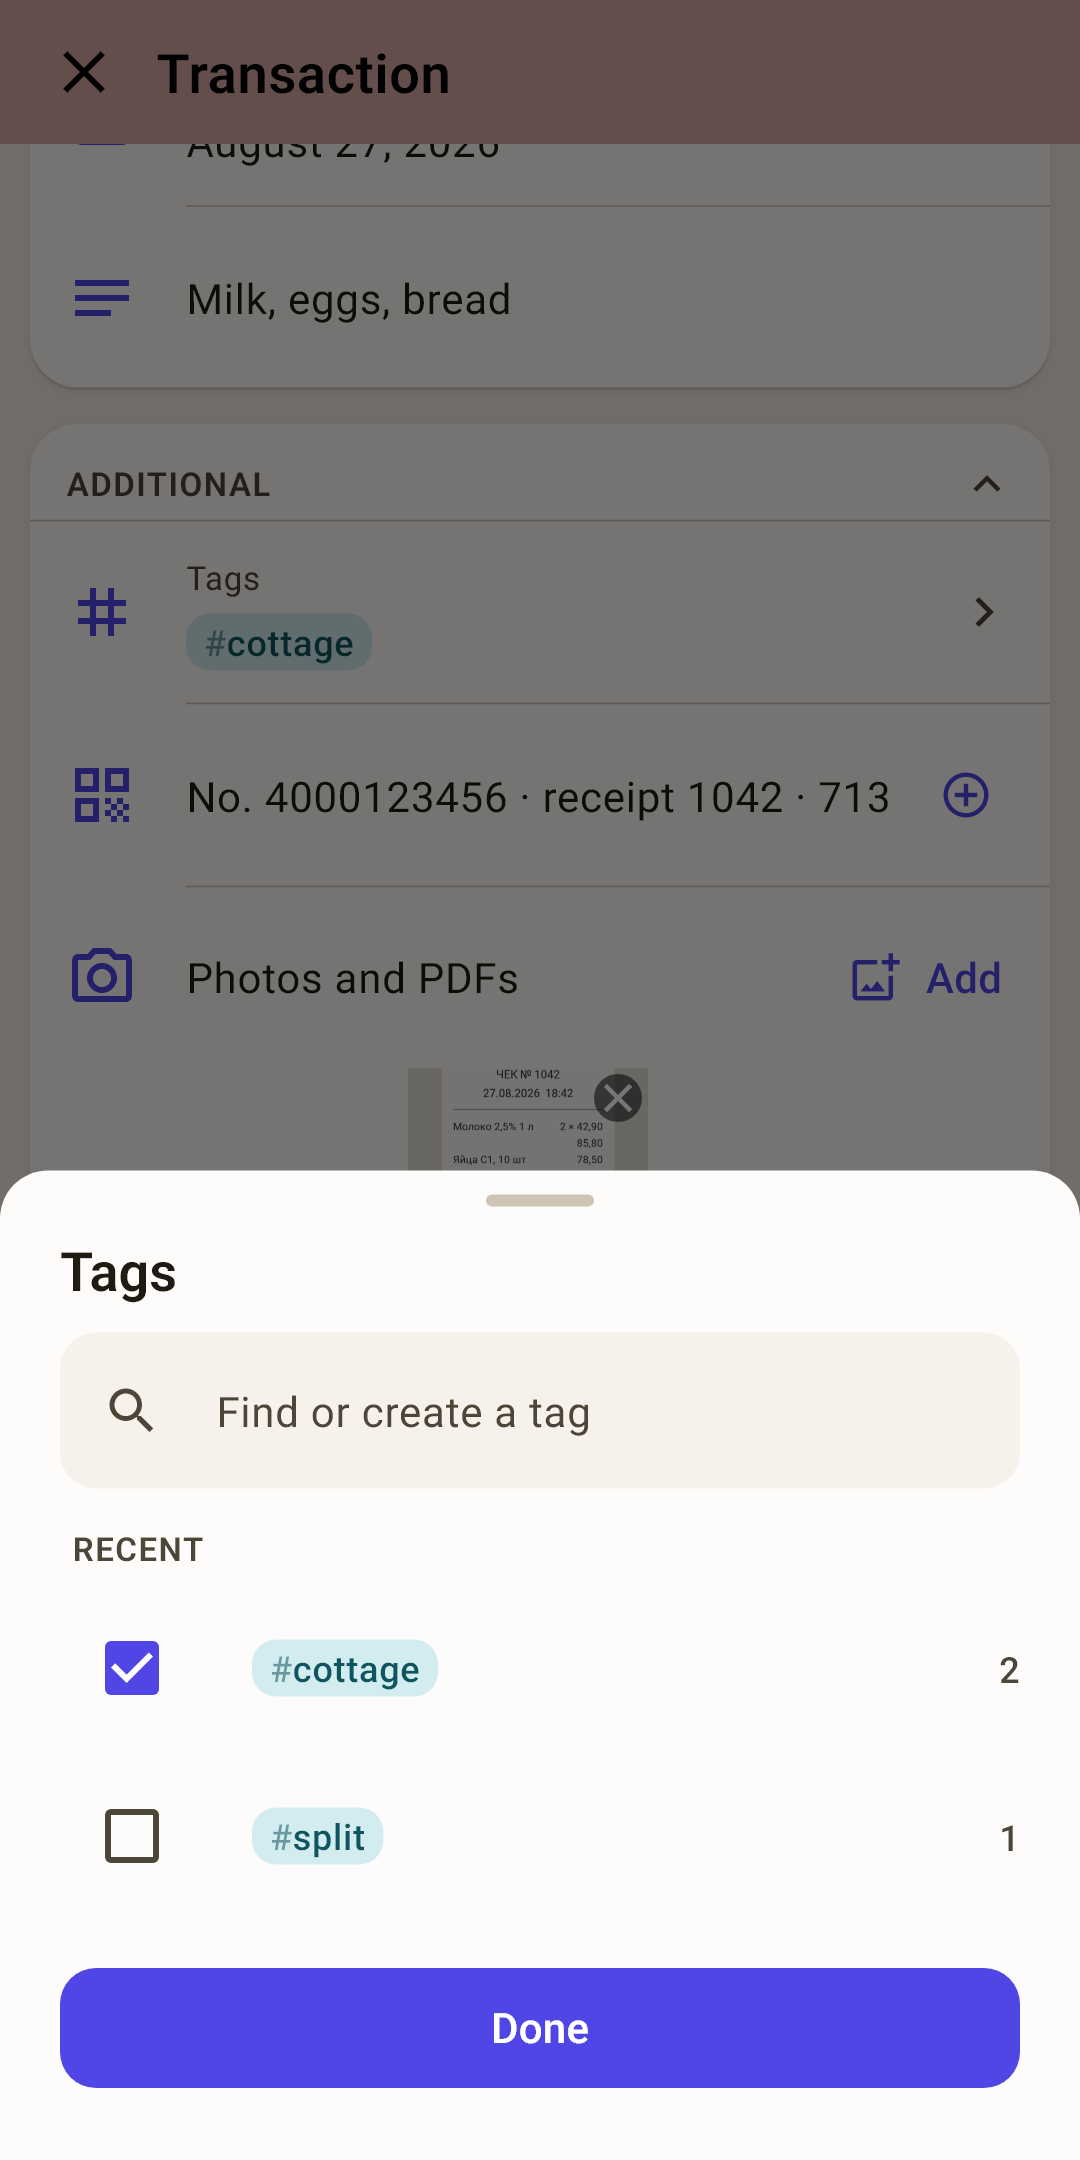
Check the tags you need — recent ones are at the top, with the number of transactions on the right.
The one you need isn't there? Type its name in the “Find or create a tag” line and choose “Create tag “…””.
Tap “Done”.
The selection isn't lost even if you swipe the sheet down. Why tags are useful and where to see the totals later — in the article “Activity”.
No time? — “To inbox”
At the checkout you sometimes have only a second: you remember the amount, but there's no time to pick a category and account.
Turn on “Settings → Data → Inbox”. Now, if the form has an amount but no category or account, the button says “To inbox” instead of “Save”, and on the amount keypad it saves right away. The transaction is recorded, but marked “Sort”.
While there are such transactions, a strip hangs above the navigation, and there's a notice on “Overview”. Tap it — the form opens them one by one, in the order you recorded them: handy for remembering the day store by store. Right after installing: off.
It's especially handy with voice: say the purchase at the checkout — and sort out at home whatever voice didn't recognize. The scenario — in the article “Voice input”.
What you can do in the form
A short cheat sheet of gestures and buttons.
| Do this | What happens |
|---|---|
| Tap the amount | Bring back the amount keypad. |
| The phone's Back button | First hides the keypad, the second time leaves (asks if anything is unsaved). |
| Press and hold ⌫ | Erase the whole amount. |
| The cross in the “Payee” field | Remove the payee from the transaction. |
| Tap the “Additional” header | Collapse or expand the rarely used fields. |
| The cross on a photo thumbnail | Remove the picture or PDF from the transaction. |